Why New York State Should Legalize ADUs

New York State is considering The Accessory Homes Act

I am excited to see that there is proposed legislation in New York State - The Accessory Homes Act - aiming to legalize ADUs statewide. Coming from Portland which has been at the forefront of the ADU trend, and Oregon which recently passed legislation to also legalize accessory dwelling units statewide, it is great to see that this housing type is spreading across the country. This is great news for New Yorkers.

This legislation is a huge win for the state of New York including homeowners, renters, affordable housing advocates, and landlords alike. It is rare to see legislation that will benefit such a wide spectrum of groups and businesses. And it is encouraging to see that elected leaders are looking for new ways to address housing issues facing our cities and towns by allowing for the addition of new housing typologies.

The Accessory Homes Act (S4547, A4854) would direct local governments to legalize accessory dwelling units (ADUs) in all areas that are zoned for residential use, thereby providing extra income for homeowners, new affordable housing, reasonable protections for tenants, and new tax revenue for local governments. The bill is backed by a diverse coalition of housing nonprofits, tenant activists, policy organizations, fair housing and immigrant justice organizations, and more

I’m particularly glad to see that part of this legislation calls for the state to make the permitting and approval process for these projects streamlined, reasonable, and affordable. This will go a long way in encouraging people to add accessory dwelling units to their properties across New York State.

Thank you to New York State Assemblymember Harvey Epstein and New York State Senator Pete Harckham for introducing this important legislation.

You can read the full bill here:
https://www.nysenate.gov/legislation/bills/2021/A4854

You can send a letter in support of the bill using this link:
https://actionnetwork.org/letters/tell-albany-to-legalize-accessory-dwelling-units?source=direct_link&


Benefits of ADUs:

  • ADUs increase housing options both for renters, multi-generational living, and for those looking to downsize.

  • ADUs are relatively affordable to build because there is no cost to the land.

  • ADUs can provide rental income to families - helping them pay off mortgages or debt, have additional spending money, save for putting children through college, or plan for retirement.

  • ADUs are inherently sustainable developments - they double down on existing infrastructure rather than requiring cities to invest in expanding utilities and roads. Being small, they also have lower demand for energy and water use.

  • ADUs provide cities and towns with new residents and an increased tax base.

  • ADUs can be beautiful - great design can make these highly desirable places to live.

  • ADUs increase property values for homeowners.

I believe when this legislation passes it will be great for New York State and I’m glad elected officials are working to allow these projects statewide. Although some may be concerned about this change and how it will affect the character of their neighborhoods, I reassure you that change is good as it shows we are making progress towards addressing some of the issues related to housing and affordability. WIth the nature of ADUs being smaller homes located on existing property, they have a minimal impact on the surrounding neighborhood other than introducing new neighbors and new customers for local businesses. I have experienced firsthand how ADUs, granny flats, or guest suites, have grown in popularity across Portland and become a highly desirable addition to properties. They have been supported by politicians, homeowner groups, housing developers, affordable housing advocates, and community groups. Each year the demand for these projects increase as people realize all of the benefits they provide. And each year more people advocate for more of these projects to be allowed as they see the benefits they bring to a neighborhood.

ADU Design Services

I have worked with clients on the design of over 60 ADU projects to date. Most of these are in the greater Portland, OR area but I’ve also worked on a projects in Seattle, and the Bay Area. Having returned to New York about a year ago I’m looking forward to advocating for these project types across the state, and working with people to add ADUs to their properties. There are a range of reasons ADUs benefit homeowners and renters alike. I have worked on accessory dwelling units aimed at aging-in-place and barrier free living. Others were targeting Airbnb or short term rentals to generate additional income. Some clients were looking to downsize and move into the ADU once their children moved out, or building granny flats for aging family members who needed additional care. Regardless of the use, ADUs are great assets for homeowners and renters alike. I even sell plans of pre-designed ADUs for those who would like to save some time and money compared to going with a fully customized design.

If you have any questions about ADUs, want to learn more about the cost of designing and building these project types, or would like to discuss design ideas for a specific project, please get in touch. I love answering questions and sharing my expertise in this wonderful project type. I’m also taking on new clients if you are looking for a designer.

The exterior design of the ADU is a contemporary twist on a traditional house form. The simple gable roof reflects the form of the primary dwelling while the cedar screen and trellis provides privacy, defines an outdoor patio, and shades the western…

The exterior design of the ADU is a contemporary twist on a traditional house form. The simple gable roof reflects the form of the primary dwelling while the cedar screen and trellis provides privacy, defines an outdoor patio, and shades the western sun.

The interior of this ADU is bright and open with a combined kitchen, livingroom, and dining area. The vaulted ceiling and large windows make the smaller dwelling feel spacious and introduces lots of natural light and views to the garden.

The interior of this ADU is bright and open with a combined kitchen, livingroom, and dining area. The vaulted ceiling and large windows make the smaller dwelling feel spacious and introduces lots of natural light and views to the garden.

Purchase pre-designed ADU Plans here:
https://lucasgraydesign.com/adu-plans

Frequently Asked Questions about ADUs

Question 1: What is an ADU?

ADU is an acronym that stands for Accessory Dwelling Unit. The term refers to adding secondary homes on a property that already has a primary residential unit. For instance, if you own a single family house and build a second, smaller home in the backyard to rent out, that would be considered an ADU. This second unit could come in many forms including detached new construction ADUs, garage conversion ADUs, attached ADUs, basement conversion ADUs, or other internal ADUs. We find that the most common and ideal option for most properties is to do a detached accessory dwelling unit as they are the least disruptive to those living in the primary house.

Different places have different names for ADUs so you may have heard some of these names: granny flats, in-law units, backyard cottages, guest suites, laneway suites, au pair suite, basement apartment, secondary units,and more.

Regardless of what we call them, ADUs are great ways to add new housing options to our neighborhoods. They are used for a variety of reasons and are excellent investments. We have designed ADUs for aging parents, long term rental income, Airbnb rentals, downsizing, barrier free living, aging-in-place, guest suites, home offices, or just to have extra space for a family.

ADUs are inherently affordable as you don’t have to buy land, and they can provide income streams while increasing your property value. They are really great investments and are growing in popularity across the country.

Question 2: How much does it cost to build an ADU?

This is almost always one of the first questions we get asked, along with how much are the permitting and design fees. Fees can vary widely depending on the specifics of your project, the scope of work, complexities of the site, your budget, style and materials used. Cost also fluctuates with the market, so prices typically rise over time. This being said, below is a rough breakdown of the the typical cost of a detached ADU project in Portland, Oregon. Depending on your location the costs could be more or less than what is shown below. For instance, in the San Francisco Bay Area, New York City, or Seattle, the construction costs would probably be about 25-50% higher. In smaller cities or towns, like those in upstate New York, or the rural towns of Oregon or Washington, the construction costs could be a bit lower.

  • $200,000 to $350,000 - Construction Costs with a General Contractor (a high-end, luxury ADU could easily go much higher than top range. We have seen ADUs for over $500,000)

  • $20,000 to $35,000 - Architectural Fees (typically 10% of construction costs)

  • $3,000 to $5,000 - Structural Engineering Fees (around 1% of construction costs)

  • $7,000 to $25,000 - Permits (The range in cost here varies greatly by the local jurisdiction. In Portland it is largely dependent on two things: 1) Is the ADU being built initially as a short term rental? If not, there is a System Development Charges (SDC) Fee Waiver. 2) Do the additional plumbing fixtures for the ADU necessitate a new water supply branch installation by Portland Water? This alone can add over $6,000 to the cost of permits.)

  • $230,000 to $415,000 - ESTIMATED TOTAL PROJECT COST

As I mentioned, this is just a rough breakdown of the project costs. Location plays a big role in the cost of the project as material prices and labor expenses can vary dramatically across the country. The specifics of your property, construction access to the site, the final design and size, the quality of finish materials, appliances, fixtures and other design elements can impact this cost. With so many variables, please use these numbers as a quick estimate to help you build a project budget and conduct more research on ADUs in your area. If you have any questions or would like to run some costs and assumptions by us, please don’t hesitate to reach out.

Question 3: How long does it take to design and build an Accessory Dwelling Unit?

This is another tough one to answer as every project and client is different and some aspects are far outside anyone’s control - like the permitting process and weather conditions during construction. In my experience it can take anywhere from 12-20 weeks to design an ADU. Permitting varies greatly by jurisdiction, but in Portland we estimate permit approvals take about 10-12 weeks (where in some of the cities in the Bay Area permit review could easily take 6 months or more). Once permits are approved, we estimate 5 to 10 months to build the ADU, depending on weather conditions, material and labor availability and other unforeseen setbacks. In total that comes out to about a year from start to finish on the shorter side and maybe 18 months or so on the longer side. This timeline is for a detached accessory dwelling unit. It could be a bit shorter if you are doing an internal ADU like a basement or garage conversion.

Question 4: What services do you provide for ADU projects?

I view my role as a guide for my clients as we work through the design and construction process. I am there to see the big picture when it comes to your project, and foster the design concept through to the intimate details. This includes interviewing you to understand your goals and ideas, your aesthetic taste, and your specific needs. I then conduct research to understand the site conditions as well as the codes and regulations that will affect the project. I guide you through an iterative design process where I help you explore what appeals to you aesthetically and what you require functionally. I then coordinate the team of design, engineering, and construction professionals as we refine the design, work out the details, obtain permit approval, and turn the drawings into a built project. During construction, my job is to work with you and the general contractor that we select to build the ADU, so that your project is built the way it was intended, and that the final project meets your expectations.

In short, I help you with everything from creating a site plan, developing the architectural concept and floor plans, all the way to selecting tiles, counters, and other finish materials. I follow your project from early concept design through completed construction working with your best interests at heart.

Question 5: When should I involve a designer for my ADU project?

I may be biased, but I don’t think it is ever too early to hire a designer. We can add great value as you consider your options and refine your goals and ideas. If you are looking for a new property to buy, we can help analyze what the opportunities or challenges could be for different options. Designers can provide important pre-design services including site evaluation, feasibility studies, programming, and can help you explore options you may not have considered. Involving a designer early in the process can help avoid costly mistakes, and increase the likelihood of your satisfaction with the project. Plus, the earlier you hire a designer, the more time they have to really learn what your needs and taste is. It is my goal to design something specific to you and your site. Where the building is beautifully integrated into the surrounding context and responds to your unique needs, taste, and lifestyle.

Question 6: Don't designers add substantial cost to an ADU project?

Design fees are an investment that can actually save you money over the course of your project. Designers are focused on your project and help you make decisions that in the best interest of achieving your stated goals. This can include tracking the budget and making design decisions that keeps the project from going beyond what you can afford to build. We are familiar with general costs of materials and systems, and how design decisions could impact construction costs. We monitor your budget and can negotiate with contractors and suppliers to get preferred pricing on materials. At the same time, the design work itself can impact project cost in a beneficial way. With a strong passion for sustainable design my work aims to reduce energy and water use which can save you money over the lifespan of your project. Selecting high quality materials and systems can reduce maintenance costs or allow you to avoid costly replacements down the road. All of these savings could be much greater the upfront design fees.

Beyond just the potential lifecycle cost savings, creative problem solving can turn a difficult property into a successful building site. We can look for opportunities to take advantage of or challenges to avoid. We also spend time documenting and detailing the design decisions to avoid costly changes once construction is underway; one of the biggest reasons projects go over budget is change orders in the field. It is always cheaper to make changes on paper before construction begins.

It is also important to remember that design fees are part of your project budget from the beginning. If you come to us and say your total project budget is $350,000 then that would include all project costs. Design fees wouldn’t necessarily increase your budget beyond that number unless you decide to increase the budget. You are in control of how much you spend and it is our job to help you manage that budget to get the best results.

Question 7: How are designers compensated?

Design fees can be based on time, a lump sum, a percentage of the construction cost, or based on the project's square footage. Each design studio has their own ways of deriving their fees and billing clients. And fees can vary depending on the scope of work, included services, complexity of the project, or even how often clients change their mind or ask for design revisions. Overall, estimating design fees to be approximately 10% of your project cost will be a good starting point when developing your budget.

Having worked with over 60 ADU clients to date has provided some insight into what clients like in terms of fee structure. I have found that clients prefer to have cost certainty as they begin their project. Hiring a designer can be stressful and there are many horror stories of design fees going far above initial estimates and getting out of control. To limit this pain point for clients, I put together a lump sum fee proposal where the fees are fixed from the beginning of work and you know exactly what you will pay for our services. As long as the scope of work doesn’t change or you don’t ask us to start over partway through, our fees won’t change. Typically the lump sum fee will be 10% of the construction budget.

Question 8: What is the client’s role in the ADU design process?

The entire design process is built around our clients and making sure we understand their goals and ideas and design to meet their taste and needs. We depend on you to communicate your design preferences, functional requirements, and budget. This last one is key. It is vital that you are open and transparent about how much you expect to spend on the project. The clearer you are at the beginning the better we can serve you as we work to design inspiring spaces that meet what you are willing and able to spend. We don’t want to design something that is over budget as we want to see our designs get built.

Your timely response to questions and design submissions will help keep the project on schedule. It is also important for you to raise any concerns you have as the project proceeds, so they can be addressed in the earliest stages. Working in partnership with us will help ensure the best possible outcome for your project.

Question 9: How long does it take to permit an ADU in Portland?

We usually estimate that in Portland it takes 10-12 weeks to receive a permit. Although we have heard that some projects are getting approved on faster timelines with the electronic permit submission now in place.

It is important to point out that each jurisdiction is different so permitting times can vary greatly. Some smaller towns or cities approve projects in a few days. Larger cities like those in the Bay Area can take many months to approve a design. We recommend you call your local building department to inquire what their typical timeline is for permit approval. Or if you would like us to help you find this information let us know. We would be happy to help.

Question 10: What is the payback time for an ADU investment?

What do you think you can get for rent? I know it isn’t great to answer a question with another question but that is really the crux of the question. If you are in a high rent area like Berkeley, California you may have a payback period of 5-6 years. If you are in a smaller town with lower rents it could be 10-15 years.

The good news is that ADU actually can pay you back twice. First is the rental income they can generate on a month-to-month basis. If you rent these out as long-term rentals or even Airbnb/short term rentals you can get revenue on a monthly basis. You would just have to check that what you can get in rent would be more than the cost of the servicing the loan you use to build the unit. On top of the rental income, your ADU also adds value to your property. If or when you decide to sell the property you will get an increased return based on the ADU that adds to the value of the main house.

Crunch the numbers to verify this, but we think they are great investments.

Question 11: How are ADUs financed?

The client’s I have worked with primarily use three ways to finance accessory dwelling units: cash, home equity lines of credit (HELOC), or cash out refinances of the main house. Right now there aren’t many financing products specifically for ADUs although as they grow in popularity this is starting to change. Banks are recognizing the value they add and are starting to be more open to financing options for adding ADUs. Many cities are also working on finding ways to create financing products to make ADUs more attainable for people of all income levels. I recommend contacting your local bank or credit union to talk about what financing options they have that would cover the cost of adding an ADU.

Question 12: What is the cost per square foot for ADU projects?

No offence, but this is the wrong question to ask. Construction costs are not proportional like this. An 800sf ADU doesn’t cost $350 more than a 799sf ADU. I know many resources on the internet talk about cost per square foot and some contractors and real estate agents talk about costs this way, but with smaller projects like ADUs it just doesn’t make sense.

Put it this way, all ADUs have some things they have to have: kitchens, bathrooms, heating, water and electricity, a foundation, roof, walls, a front door. These tend to be the more expensive parts of a home. Where a full sized home can distribute the cost of these items over lots of square footage in empty bedrooms or living rooms ADUs don’t have that ability. If you did calculate the cost per square foot of an ADU it would be much higher than the square footage costs you find on other sites.

Quick example, the project image at the top was an ADU that was about 500sf and cost about $200,000 in construction costs. That is around $400/sf. or $500/sf if you include the full project cost. Now lets say we added another bedroom and expanded the living room to make that an 800sf unit. The new cost wouldn’t be 800sf * $500/sf for a total cost of $400,000. Instead it would probably be around $300,000 total, an addition of around $50,000 in construction costs.

Costs just aren’t proportional to square footage so please start thinking about total budget rather than per square footage. If you have a budget of say $300,000 we could design you a nice 400sf unit or a nice 800sf unit. In both situations we would design a project that balances your budget with your goals and needs.

I’m glad we all agree to think about cost differently.

Question 13: Can I buy a pre-designed ADU Plan?

Yes you can. Depending on the local codes and regulations there could be a predesigned ADU that meets your goals and the local rules. In fact, we sell ADU plans of projects that we have designed to offer great modern design to more people. We understand that not everyone can afford or wants to spend the time on a custom ADU design. Buying a predesigned planset may be the right path for you. It could save some money and time. However, each local jurisdiction has their own sets of rules that determine what can be built. It is up to you to make sure that the plans you buy meet the regulations where you live.


If you have any further questions don't hesitate to send us a message. We love talking with people about their ideas and helping them consider their options. We will do our best to get back to you as soon as possible. Thanks.

This modern ADU in Portland had a construction cost of about $200,000. The clients then invested another $25,000 or so for the landscape design and construction. Including the design fees, engineering fees, and permitting cost the total project cost…

This modern ADU in Portland had a construction cost of about $200,000. The clients then invested another $25,000 or so for the landscape design and construction. Including the design fees, engineering fees, and permitting cost the total project cost was approximately $250,000.

The Importance of Designing for Acoustics

Below is an expert from my newsletter discussing the acoustics of the built environment. Acoustic design should extends into the places we call home. Too often, design focuses on the visual senses. We care so much about how things look or how light impacts a room that we forget the other senses that a design should consider. Acoustics in particular can turn a beautiful space into an uncomfortable place to live. Whether it is blocking the noise of the outside, creating a quiet place to read and think, or finding ways to introduce the sounds of nature into the interior, acoustics are something that are an important consideration as I design homes.

A snowy walk through the streets of Fort Greene, Brooklyn reminds me of my childhood. It has been 17 years since I have lived in a climate that has snowy winters and it is a pleasure waking up to snow blowing past our apartment windows, covering the surrounding rooftops, and accumulating on the streets. Snow transforms the city in many ways. Often overlooked and under appreciated is how it transforms the city’s acoustics.

I love cities and have lived in some of the largest and busiest urban centers in the world. From the frigid winters of Montreal to the heat of Bangkok, the crowds of Shanghai to the artistic hub of Berlin, the outdoor paradise of Portland to my current home in New York City, each place has it’s own character and pace of life. And each has it’s own soundscape.

Almost every morning in Portland I was unpleasantly awoken at sunrise by the screech of crows. Here in NY there is a constant drone of the noises of city life. Traffic roars along Flatbush; people unrelentingly express their love of car horns; sirens grow and fade as ambulances or police race through the streets; helicopters whirl overhead as they crisscross the sky carrying police or billionaires to some important destination. The biggest downside to life in a city is this constant noise.

Snow changes all of that. Traffic dissipates as people huddle indoors. With less traffic, there are fewer car horns, reduced tires on the roads, and less emergencies needing attention - thus fewer sirens. Flights are grounded leaving the sky clear of human made sounds. Meanwhile the falling snow blankets the city with an acoustic carpet, deadening the audible soundscape.

It is refreshing, and a reminder that cities are more pleasant without the rumble and rattle we all make. The quiet streets are a joy to wander down. In the park you hear the deadened sounds of children laughing as they sled and play in the snow. An occasional dog barks. You hear the slight wind or creak of trees. The snow muffles the intruding sounds beyond the park’s borders.

We need to remind ourselves that cities don’t have to be so noisy. We can design places that have better acoustics and thus create better places to live. We can restrict traffic - either by closing streets, removing lanes, or implementing congestion pricing. Adding protected bike lanes would encourage people to drive less. Charging for parking and subsidizing public transit would further reduce car use. Electric vehicles can replace the roar of combustion engines. It would be an easy political win to ban helicopters as they are completely unnecessary and only serve a tiny handful of people.

The design of our streets, public spaces, and buildings can consider the acoustics of the urban environment just as they respond to climate, weather, and other functions. While we currently focus on how things look, we rarely discuss how the built environment impacts how things sound. I hope this changes.

Cities can be places where the noises of nature outweigh the sounds of human. Sirens and traffic could be the exception rather than the dominant force in the urban soundscape. I’d rather hear the sounds of wind, the songs of birds, or simple have quiet spaces to walk and think, even when I’m in the heart of a dense urban environment.

Subscribe to our newsletter here: lucasgray.substack.com

How Much Does An ADU Cost?

More and more people are considering having an ADU designed and built for their property, and one of the primary questions they have is how much does an accessory dwelling unit cost to build? People like you want to know how to start budgeting for ADU projects whether they are living on Bainbridge Island outside of Seattle, in Portland, OR, or down in Los Angeles, California. ADU Cost is one of the most common questions we get and we will do our best to outline the areas that impact ADU budgets below.

The problem with googling “ADU Cost”

A quick search on google for cost of construction can lead to a wide range in estimates, and most of them are not realistic, especially for ADUs. Having worked on over 60 ADUs to date we have designed everything from simple 500sf projects on flat lots to larger 1000sf ADUs on tricky sloped sites. We have a good sense of the cost ranges for these projects and what factors impact the final price. We will do our best to outline how to set your budget and then will give a breakdown of ADU costs from a recent project that you can use as starting point to build your budget.

But first, let’s discuss cost per square foot numbers and why you shouldn’t use this is a way to develop a budget for ADU projects.

Many resources on the internet, some contractors, and many clients use cost per square foot as a basis to develop a budget for residential projects. I want to urge you not to use this as a metric to analyze your ADu budget. Although this can work if you have your numbers correct, we find that it can be very misleading for budgeting an accessory dwelling unit compared to a full custom home. The main problem has to do with scale.

Just like a large home, ADUs have all the expensive parts needed to live - a functional kitchen, bathrooms, plumbing and electrical systems, windows, doors, excavation and utility work, plus design costs and permitting fees. On a large home these costs get spread out over the larger square footage and cheaper space to build, like bedrooms and living rooms. A good way to think about it would be that the cheaper rooms like bedrooms and living rooms subsidize the more expensive rooms like kitchens and bathrooms plus utility connections, etc. ADU floor plans don’t have this advantage since they are limited in size.

Not all square footage is the same cost. A bedroom is just empty space with blank walls, a couple of windows perhaps, some flooring, and a couple of doors. This is relatively cheap to build. A kitchen on the other hand has all the walls and floor, but more lighting, appliances, counters, cabinets, plumbing work, more complicated electrical, etc. It is much more expensive to build. Where a bedroom may be $150/sf a Kitchen is more like $400 or $500/sf. This means that going from a 700sf to an 800sf project can actually bring your cost per square foot down considering both have a kitchen and a bathroom. The 800sf ADU spreads those costs out over an additional 100sf.

With ADUs being so small, they don’t have the extra square footage to spread the base costs out like a larger home does. A $200,000 five hundred square foot ADU would have a cost per square foot of $400. Where a $600,000 two thousand square foot home would only be $300/sf.

The point here is that we encourage people to develop a budget and then work to design something to hit that total project number. The size of the unit is less of an impact on final cost than the form, site conditions, materials, and systems selected. Start your project knowing that the base cost of building an ADU will be about $200,000 and then the decisions you make with your design team will impact what the final cost ends up being. Our advice is usually that ADUs come in between $200,000 on the low end and $500,000 on the upper end. We have seen some luxury ADUs in the Bay Area and Los Angeles even exceed $500,000.


How Much Should You Budget For Your ADU Project?

ADUs have three main costs to build into your budget: design fees, permitting fees, and construction costs.

ADU Design Cost

For a custom designed ADU you can expect that the design cost will be between 10-20% of your total project costs. These would include the cost of an architect or designer, structural engineer, surveyor, and other consultants that may be needed. Although most people decide they want a custom designed ADU that is specific to their needs, aesthetic taste, and responds to the unique character of their property, it is possible to save on the design cost by starting with a pre-designed ADU plan set. If you are trying to bootstrap a project and reduce costs as much as possible this could be a good way to go. We sell ADU floor plans of our past projects for those looking to save time and money. Shop for a floor plan design that works for you here: Modern ADU Floor Plans

ADU Permitting Cost

Permitting fees can vary greatly from city to city, but in Portland, Oregon you can expect that the permit fees for a detached ADU would be between $6,000 and $14,000, potentially more if you are going to use the ADU as a short term rental like Airbnb or VRBO. The big range here has to do with water service and whether you will have to upgrade the water meter for the property and/or add a new water meter for the accessory dwelling unit. If you are able to simply tie in to the existing water and sewer service of the main house you would fall on the lower end of the range. However, you may want to chose to install a new water meter if you will be using the ADU for rental income, so you can pass on the water utility bill to the tenants.

ADU Construction Cost

Construction cost is the big variable and depends on the site conditions, project size, design complexity, and the selection of materials and systems. We find that with today’s construction costs building an ADU, even smaller simpler projects on flat sites, will come in at $200,000 or more. That is sort of the baseline price, and the cost can go up from there depending on some of the variables mentioned above. Building an ADU can be complicated and we don’t advise taking shortcuts to save cost.

Although $200,000 is achievable for a nice but simple ADU, in our experience, most clients decide to add features that drives the cost up from that baseline. Whether it is nicer windows, higher performing systems, nicer interior finishes, high-end appliances, or premium materials, there is almost always a decision that is made where the clients balance the quality vs price and decide to upgrade the design. For this reason, we say that the average price of an ADU is about $250,000 in the Portland market. In places like the Bay Area or Seattle the average cost for an ADU is closer to $350,000 or more. On the higher end of the scale, if you are looking for a premium luxury ADU with the top of the line systems and appliances, high-end materials, and a premium design, you can look to spend $400,000 to $500,000 or even more.

Keep in mind that these construction cost estimates are for the construction only. On top of the construction costs needed to build the ADU, there would be the 10-15% in design fees and $6,000 to $14,000 in permitting fees. When you build your budget and talk to your design team about the project costs, make sure to be clear what the costs of construction are and what the total project costs are. $200,000 in construction costs probably means a total ADU project budget of closer to $240,000.

Interior view of a studio ADU on the second floor with a home office below.

Interior view of a studio ADU on the second floor with a home office below.

 
This project current being designed is on a sloped site which requires additional concrete foundation work.

This project current being designed is on a sloped site which requires additional concrete foundation work.


Accessory Dwelling Unit (ADU) Construction Cost Breakdown:

To give you a sense of how the construction budget gets to those ranges, below we have broken down a budget for a 790 square foot ADU we designed in the Cully Neighborhood in NE Portland. This ADU is being used to generate rental income and the couple who built it plan to move into the ADU when their kids leave the house. It was designed for aging-in-place with all necessary living functions on a single level.

Below is a rough construction cost breakdown for a 790 square foot sustainable ADU that was built in the summer of 2015 in Portland, OR (we’ve inflated pricing below to reflect an average 6% construction cost increase per year since that time). This design has a few unique elements that are reflected in the cost breakdown. The design includes a high performance envelope - typical wall construction with standard batt insulation walls & roof per code, plus an additional 2” of continuous exterior insulation on all the walls, and an additional 3” of continuous exterior insulation added to the roof, plus a fully insulated slab. We also designed it to have radiant floor heating with an on-demand hot water system. There was also a couple of unique custom windows that are significantly more than standard windows would be - however they were important to the design and function of the spaces.  

Finally, this breakdown is for the construction costs and doesn't include Architectural or Structural Design Fees. The design fees vary depending on the complexity and size of your project. We recommend budgeting about 10-15% on top of the construction cost for design fees, $6-14k for permitting, and we always recommend budgeting another 10% as a contingency fund to cover any unexpected costs that may come up.

Permits: $12,000
This includes the current Portland SDC Waiver. Typically permitting fees for an ADU fall around $6-$14k. This project came in at the higher end due to the fact we had to upgrade the water supply line & meter size due to the amount of plumbing fixtures in the main house and ADU combined.

Excavation: $15,000
Around a 650sf slab area including the exterior decks. Also included excavation for a couple landscaping retaining walls on the property.

Concrete Work: Footings & Retaining Walls: $28,000
This includes work needed for the ADU plus a couple of retaining walls that were designed as part of the surrounding landscaping.

Concrete Slab: $8,000
The interior exposed concrete slab and finishing for the floor of the main level. This was poured as a separate slab from the foundation footings.

Framing and Sheathing: $25,000
Typical 2x6 stud wall construction, 2x12 roof joists, supporting structural posts and beams. The large exposed glulam beam in the center of the project was around 30’ long to span the length of the living space.

Siding: $12,000
Horizontal fiber cement siding with vertical tongue & groove cedar siding at the front entry and back patio, as well as a cedar soffit under the eaves.

Roofing: $15,000
Standing seam metal roof

Windows and Doors: $15,000
2 custom windows (including a complex window that wraps the corner of the kitchen), 3 skylights, 8’ front door with sidelite, 8’ two panel sliding door, and three large vinyl sliding windows.

Plumbing: $25,000
Includes radiant floor heating installation and an on demand hot water system. Plumbing fixtures, sump pump, fire protection sprinklers & installation.

Electrical & Fixtures: $20,000
Electrical panel, electrical wiring, outlets and switches, lighting fixtures, and installation labor.

Insulation: $12,000
Roxul batt insulation in walls and ceiling stud cavities per code, plus an additional 2” of continuous exterior polyiso insulation on all walls, 3” of continuous exterior polyiso insulation added to the roof, and a fully insulated slab on grade. (This amount of insulation is well above code requirements and is close to passive house standards. With some solar panels this ADU could easily achieve net zero energy. )

Sheetrock (Drywall): $10,000
Drywall, mudding, taping, sanding

Interior Doors: $2,500
2 standard doors, 1 pocket door and 3 closet bi-folding doors

Paint - Exterior: $5,500
One color, no accent or trim color

Paint - Interior: $8,000
One color throughout the interior.

Trim Work: $5,500
1x4 painted MDF base trim, plus clear coated fir window sills

Cabinets: $6,500
IKEA kitchen cabinets and some custom casework in laundry and bathroom

Countertops: $1,500
Ikea wood countertops material and install labor

Tile: $7,000
Kitchen backsplash and shower - materials and labor

Staircase: $3,500
Off the shelf spiral staircase kit

Flooring in Loft: $3,500
Pre-finished solid White Oak, about $8/sf plus misc. materials and install labor

Cable Railing: $3,500
Off the shelf system

Appliances: $7,000
Stovetop, oven, vent hood, dishwasher, garbage disposal, refrigerator, washer, and dryer

TOTAL: $251,000
Includes all materials, labor and contractor fees.

The budget above is fairly typical for ADUs we have worked on over the years. And it is important to point out that this wasn’t a high-end or luxurious project. There were a few places where the clients made decisions to invest more to get the result they were looking for. For instance we had some custom windows, skylights, and radiant floor heating. The rigid insulation was also an upfront cost but will pay itself back through lower energy bills for the lifetime of the project. Meanwhile, the rest of the project was pretty standard materials and systems and in some places we used cheaper than normal elements, like the Ikea kitchen. Overall, we think this is a good starting point for most people who want a high-quality, nicely designed accessory dwelling unit in Portland, Oregon.

Important Note:
Every site is different and the conditions can greatly impact cost. Excavation and concrete work costs can vary greatly depending on the topography and of the site and other conditions (is it sloped? lots of trees? poor soil conditions? Does it need extra soil removal or backfill?). Ease of access to the location of the ADU can also add costs (are there fences that need to be removed and rebuilt? Can machinery get to the location to excavate or deliver materials? will a crane rental be required?). Material selections and other design decisions you and your designer will make throughout the process will also have a big impact on cost. The outline above is a good starting out point but I guarantee your project will end up being different.

If you have any questions don't hesitate to reach out. We are always happy to talk about the unique aspects of your project and talk through your goals and ideas for a sustainable Accessory Dwelling Unit.

This ADU in the Cully Neighborhood of Portland would cost about $250,000 to build.

This ADU in the Cully Neighborhood of Portland would cost about $250,000 to build.

 
Interior view of the ADU’s main living space with an open loft above. A 30’ long glulam beam spans the length of the living room.

Interior view of the ADU’s main living space with an open loft above. A 30’ long glulam beam spans the length of the living room.

 
A large custom window wraps the corner kitchen, offering great views to the surrounding yard.

A large custom window wraps the corner kitchen, offering great views to the surrounding yard.

What Is An ADU And Why Should You Build One On Your Portland Property?

Accessory Dwelling Units, ADUs for short, refer to a second home on a property that already has a main house. Typically these are smaller than the main home and are detached structures located in the backyard. However, they can also be internal ADUs adding an apartment within the main structure. For instance, you could convert a basement into a separate apartment or renovate an attached garage into a new living unit.

Most often ADUs are built by homeowners who want to add a unit to their property to earn rental income, use as a guesthouse, or for a relative to live. People also build these for themselves in order to downsize and allow them to rent out the larger main home. With the growing popularity of ADUs around Portland and across the country, many new houses are being built with ADUs as part of the development. We see many new homes include basement ADUs as part of the selling point for new homeowners.

Portland has grown into one of the most popular markets for Accessory Dwelling Units. With recent changes in state and local laws, ADUs are now permitted on any residential property. And the city of Portland has seen applications for accessory dwelling units skyrocket over the past few years. We foresee this trend growing further as housing prices increase and limitations loosen even further. In the summer of 2021 Portland will allow multiple ADUs per property which should contribute to even more of these housing types being built.

ADUs are a great way to increase the value of your property and earn additional income by renting one out. The extra revenue can help you pay off your mortgage faster, afford a larger house or a home in a more desirable area, or just give you extra money to live more comfortably or take a nicer vacation.

As well as being a great investment for most homeowners, ADUs also are great assets for our communities. Housing costs continue to rise, often outpacing increases in income. More an more people are searching for housing opportunities that are affordable and are in desireable urban neighborhoods. Accessory Dwelling Units are a great way to address these issues. They add new housing while maintaining neighborhood character. They increase density while being sensitive to the surroundings, and the new residents also contribute to the local economy, boosting small businesses. And with the additional residents, cities get additional revenue to provide services like better public transit. They really are a win-win for everyone.

To summarize, Accessory Dwelling Units can provide rental income, an increase in property values, housing for family members, and on a neighborhood scale they create desirable growth without needing to add new infrastructure, while providing affordable homes. The new residents also will benefit the local cafes, restaurants, and shops - a boon to local businesses.

I have led the design effort on over 60 ADUs to date, with a focus on developing beautiful solutions for these project types while incorporating sustainable design strategies. I’ve developed an expertise in these projects because I believe in their ability to positively impact our communities.

Thousands of Portland residents have already added an ADU to their property, to take advantage of some of the benefits described above. I anticipate that this trend will continue to grow considering that Portland will soon allow multiple ADUs per property. It makes sense that many people who already have detached ADUs in their backyard will now consider adding another in their basement, or housing developers may create new developments with basement units and detached ADUs as a new product as the market starts demanding homes that have built-in revenue streams.

I am excited to see how this market shifts and grows over the coming years. My goal is to help guide people through the process of adding ADUs to their properties - creating beautiful and sustainable designs that are environmentally, socially, and economically responsible investments.

If you are interested in learning more about accessory dwelling units, or have questions about an ADU project you are considering, please don’t hesitate to reach out. We are always willing to discuss your goals and ideas and offer advice or design services to help you achieve your vision.

The Namaste ADU in SE Portland was designed as a modern home that opens to a Japanese inspired garden.

The Namaste ADU in SE Portland was designed as a modern home that opens to a Japanese inspired garden.

 
This ADU in NE Portland is a 2-bedroom apartment perched over a 2-car garage. The design aimed for a balance between the traditional craftsman style homes in the neighborhood with a contemporary feel.

This ADU in NE Portland is a 2-bedroom apartment perched over a 2-car garage. The design aimed for a balance between the traditional craftsman style homes in the neighborhood with a contemporary feel.

 
A compact layout allows the ADU to be tucked back into the landscape, preserving private outdoor spaces for both the main house and accessory dwelling unit.

A compact layout allows the ADU to be tucked back into the landscape, preserving private outdoor spaces for both the main house and accessory dwelling unit.


You can learn more about Portland ADUs and the Permitting Process here:
https://www.portland.gov/bds/adu-permits


ADUs have different names depending on where you live. We have also hear the following names used interchangeably:

Alley Apartments, Detached Accessory Dwelling Unit, DADU, Accessory Apartment, Accessory Suite, Ancillary Unit, Backyard Cottages, Basement Apartments, Carriage Houses, Garden Cottages, Garden Suites, Granny Cottages, Granny Flats, Granny Pads, Granny Units, Guest Suites, Home within a Home, In-Law Suite, In-Law Unit, JADUs, Junior Accessory Dwelling Units, Laneway Houses, Laneway Suites, Mother-In-Law Flats, Multigenerational Homes, Next Gen Units. SDUs, Secondary Dwelling Units, Secondary Suites, HGTV has popularized Tiny Houses although that often means small homes on wheels which aren’t really what ADUs are. In Hawaii they have Ohana Units (and by the way, we would LOVE to do a project in Hawaii).

Op-Ed: Why ADUs Are A Great Benefit To NE Portland

By Lucas Gray

Accessory Dwelling Units, or ADUs, are secondary residences that can be built on any residential property in Portland. As housing costs continue to rise, many neighbors search for affordable housing for themselves or loved ones and ADUs can provide wonderful places to live while being much cheaper than buying a house in today’s market. They are also great ways to earn rental income for homeowners, potentially allowing people to stay on their property even if the neighborhood gets more expensive. In short, ADUs are great investments that help build wealth and provide much needed housing. They can be an important part of creating diverse and thriving communities.

We have been working in NE Portland over the past five years to help people navigate the design, permitting and construction process for ADUs. We find ADUs to be great ways to address our housing shortage, while preserving the neighborhood character that we all enjoy.

Here are a few reasons we think ADUs are a great fit for Portland and something that everyone should consider adding to their property:

  • ADUs create opportunities to provide housing while preserving neighborhood character.

  • ADUs are sustainable - by doubling down on residential areas with existing infrastructure and services (preventing urban sprawl).

  • ADUs give homeowners an opportunity to capitalize on their current investment (their property) and build wealth, provide passive income, and help people plan for retirement.

  • ADUs allow for multi-generational living and aging-in-place

  • ADUs are a popular way to downsize while remaining in the community you’ve grown to love.

Most of the time ADUs are detached buildings (like a backyard cottage), but an ADU can also be created within a renovated basement, attic, or garage. Each property and family is unique, so we work with our clients to talk through all of the options available and find the best solution to their situation - based on budget, existing conditions of the property, and what their goal is for the new structure.

Like any investment, there are associated are costs. ADUs are not cheap - we find they cost between $200,000 and $300,000 in the Portland market, depending on size, complexity, finishes, etc. However, some more luxurious projects have come in well above that range. This cost is relatively similar regardless of whether you are building new or renovating. Renovating basement or garages into an ADU is not necessarily cheaper than a new building, as often it is more complex to work within an existing structure. In general, new, detached, ADUs are the simplest to build but we have worked on all sorts of ADUs to date.

We are passionate about ADUs as they can be economic, social and environmentally sustainable housing opportunities. If you have any questions or are considering building an ADU, we offer a range of free resources on this website and even sell ADU Plans for those looking for a cheaper faster way to get an ADU project started.

Design Inspiration: 4 Custom Homes We Love

As part of our design process we are continuously searching out other projects that inspire us. We use precedents to see how architects that we admire address similar challenges of designing custom homes. We look for creative uses of materials and try to understand how things were detailed. We look for layouts and forms that could be relevant to projects we are working on. Precedent studies are also helpful to share with our clients to learn what they like and challenge preconceived ideas for what a home can be. Below are four homes designed by some of our favorite residential architects that inspire us. These are projects that we find are incredibly beautiful and reflect some of our design values.


Bates Masi Architects - Underhill House

There are three big reasons why I love this house: natural materials, strong connection to the outdoors, and the courtyards. The architects did an incredible job at blurring the lines between interior and exterior space, with sliding doors that open the corners of the rooms, making the structure dissolve into the surroundings. The courtyards that puncture through the house bring light and nature deep into the flow of the living spaces. Despite using a traditional material, cedar shingles, they created an undeniably contemporary design. The warping forms of the roofs, large window and door openings, and corner openings reinforce that this is a contemporary home while the shingles harken back to the traditions of the area. This is a superb design that reflects a lot of our design values: materiality, connection to nature, and craftsmanship.


Cutler Anderson - Beaux Arts Residence

This house is beautifully integrated into the landscape with the walls of glass making the living spaces feel like they are outdoors. I love the celebration of the exposed structure and the fact that the interior is all natural wood - no drywall to be found. Elevating the roof of the living spaces give it a lofty feel and the clerestory windows bring in natural light from all sides - accentuating the connection to the outdoors and the cycles of the days and season.


Olson Kundig - Delta Shelter

A project I’ve admired for years, the Delta Shelter is a perfect example of how great design can come in a small package. Bigger doesn’t mean better and this shows that quality transcends quantity. The setting is incredibly beautiful and the architecture compliments the surroundings. And of course, this project has the Olson Kundig trademark of mechanical gears that transform the structure into something dynamic. In this case, wheels, gears, and chains allows the entire home to be opened up or closed down to protect the expansive windows that connect the interior with views to the surrounding forested mountains. I also love the simple material palette of steel structure and wooden infill panels - again, no drywall is used allowing the interior to have the warmth and texture of natural wood permeate the space.


Glenn Murcutt - Fredericks / White House

I was lucky enough to participate in the Glenn Murcutt International Masters Class back in 2008. It was an incredible experience studying with Pritzker Prize winner Glenn Murcutt along with a handful of other incredible australian architects. It was an intensive two-week design studio and during my time there we were also able to visit a few completed houses designed by the teachers. This one, the Fredericks/White House, was particularly inspiring in the way Mr. Murcutt was able to take standard industrial materials to wrap a house that exudes suck warmth on the interiors. The simple form allows for the details of the interior to be the driving force behind the design. The architecture is further informed by its response to the local climate, with sun shades, indoor-outdoor rooms, and water collection all becoming an integral part of the design expression. The photos below are a few that I took on my trip. They aren’t great and don’t fully capture the beauty of this project.


The common theme in these projects and in our own work is the importance the landscape has in the quality of these homes. Blurring the lines between indoors and outdoors, integrating the homes into the surroundings, and taking advantage of borrowed views are all vital to creating beautiful residential projects. We hope that these projects inspire you as much as they have us. And if these projects resonate with you, please reach out as we would love to work with you to craft beautiful spaces that are warm, inviting, inspiring, and respond to the natural world around us.


Reflections on Year 1 in New York City

A new city, a new home, a new place to explore.

It was a strange time to move to New York. We arrived on April 1st, 2020, flying on an empty plane between empty airports, at the peak of the first wave of the Coronavirus pandemic. At the time we were unsure if we made the right decision, but looking back in many ways it worked out for the best. Shortly after our arrival, cases plummeted in NYC as the pandemic surged in other parts of the country. Most of the people here took it seriously and the local government worked hard to educate people and implement new rules to help limit the impact of the disease. Masks were prevalent everywhere we went, and we changed our lifestyle to stay as safe as possible. Our days meant working from home, cooking from home, and long masked walks through our new home city, exploring new neighborhoods.

Rather than the hectic energy of the big city - the rushing crowds, honking cars, street vendors, and rumble of subways - we were greeted with empty streets, closed stores, and a shortage of toilet paper. It was surreal to wander through the streets of Manhattan, literally walking in the road to avoid people on the narrow sidewalks thanks to the lack of cars. The city was quiet - one of the things that struck us the most. We could hear birds singing in the morning. There were more pedestrians and bikers than cars and it had a dramatic impact on the sounds of the city.

Walking north, up the center of 5th avenue.

Walking north, up the center of 5th avenue.

Perhaps a once in a lifetime opportunity: Times Square with no crowds or cars. Simply two bikers amongst the towers and billboards.

Perhaps a once in a lifetime opportunity: Times Square with no crowds or cars. Simply two bikers amongst the towers and billboards.

The absence of cars was striking. It made urban spaces incredibly pleasant. Streets were calm and safe. Parks were dominated by the sounds of nature rather than the traffic surrounding them. Walking and Biking became the primary form of transportation as people stayed away from the subway and most stuck close to home. We saw adults learning to ride a bike for the first time using the Citibike bike share system on the streets of Brooklyn. Sidewalks became less cramped because people could safely spill out into the streets.

Parks became centers of community life until the Mayor finally agreed to close some select neighborhood streets for cars so people had more space. Socially distanced neighborhood events started popping up with masked bands and DJs playing impromptu concerts. Restaurants could finally put tables out in the street to stay in business, and families would show up with picnics and games and set up where once there was just 4 lanes of traffic. As the weather warmed up and spring turned to Summer the city started feeling more like a city again, as fear subsided and people started to venture out and use urban spaces.

Every weekend they would block off Vanderbilt Ave to cars and it would become an open street for people, bikes, restaurants, and music. Hopefully this transformation outlasts the pandemic.

Every weekend they would block off Vanderbilt Ave to cars and it would become an open street for people, bikes, restaurants, and music. Hopefully this transformation outlasts the pandemic.

It has been a fascinating time to be here. Watching the city rapidly evolve and adjust as new information about the virus was balanced with the needs of millions of people demonstrated how flexible we could be and how quickly we can make changes to the built environment. We don’t need to waste years in committees, running lengthy and fruitless community engagement workshops, and haggling with politicians. We don’t need to invest millions of dollars to build new infrastructure. We need to be nimble. Experimentation should be celebrated. Failure should be tolerated as it becomes lessons learned to make the next projects better. Change doesn’t need to cost millions when some paint, planters, and barricades can make a traffic clogged street into a linear park for a few hundred dollars.

I hope some of the great changes we saw in the city this year aren’t fleeting responses to the pandemic and instead stick around long after the vaccine makes it safe to gather again. I hope people saw how great it was to have safe streets for walking and biking. I hope most people realized that birdsongs sound better than car horns when waking up. I hope people saw that Vanderbilt (or their local closed streets) on the weekends could be a celebration of community and that is a better use of space than as a thoroughfare for automobiles.

Ultimately, I hope that the sacrifices we made as individuals, as a community, as a city, and as a country to get through the pandemic can lead to positive changes to the places and spaces we call home.

What Makes a City Beautiful?

This is a question I often ponder as I travel and visit cities throughout the world. Is it the surrounding landscape - like the snow capped mountains, rivers, lakes, and oceans? Is it the awe inspiring skyscrapers or beautiful old churches? Or could it be something else - perhaps a more human scale built environment, or widespread parks, trees and other green spaces?

On a recent trip around the world I visited a vast range of urban conditions that were often disheartening, sometimes stunning and yet often enough too similar. From Japan to Russia and on to Europe, cities tended to blend from one to another losing the unique qualities of regional architecture. Landscapes were too often obscured by towers or tucked away below roads, bridges, buildings and other concrete monstrosities. Skyscrapers are all too familiar, boasting smooth glass facades while towering over adjacent concrete apartment blocks. Whether in Tokyo, Shanghai, Sydney or Toronto the buildings didn't reveal the uniqueness of the local culture, climate, or history.

I look at cities that celebrate their unique conditions and that is where I find beauty. Berlin celebrating the river Spree and its many canals lined with parks and grand public buildings pops into my mind as a beautiful urban environment. Hong Kong with its narrow streets, stunning architectural skyline backed by a beautiful mountains, and magnificent views of the harbor filled with boats is another example of a city that is complementing the grandeur of its environment.

Too often in America, cities turn their back on their environment. Elevated roads and rail yards separate downtown districts from adjacent lakes, rivers, or coastlines. Buildings rely on air conditioning and other mechanical systems in order to ignore rather than celebrate the influence of the climate. Other cities blessed with an abundance of stunning landscapes lack great architecture - Portland and Vancouver pop into mind. Montreal turns it back to the St Lawrence River. Bangkok has replaced the majority of its hundreds of canals with roads. At least Sydney has embraced its water front and historic harbors.

I know there is not an easy answer to this question. Cities are huge complex entities that grow and morph over hundreds of years. I believe that urban planning and architecture that celebrates the local climate, landscape, materiality, and culture is a step in the right direction but too often overlooked.

New-York-City-Skyline-Lucas-Gray-Design.jpg

From Portland to New York City

I moved to New York!

PDX-NYC.jpg

After 10+ years living in Portland, Oregon, I am relocating to New York City.

My wife got a job at Sidewalk Labs, and she will be working to bring smart timber cities to the world. I sold my shares of Propel Studio Architecture to my business partners, and will be looking for new architecture/design/development opportunities once we arrive in NY (Let me know if you have any job leads). In the meantime, I'll be occasionally updating Talkitect as I get inspired, coordinating our move, managing a renovation to our condo in Portland, and working with students at the PSU Center for Public Interest Design to get one of their prototype ADU designs permitted and build.

There are many aspects of this move that excite me as I will be able to explore a new city, make new friends, wander through new neighborhoods, eat great food, experience great architecture, and pursue new career opportunities. However, one small thing that will kick off this adventure is a three day train ride from PDX>NYC. 10 years ago I moved to Oregon from Albany, NY by train, and I'll be making the round trip complete in a few weeks when I take an Amtrak Sleeper car back to the east coast. Three days with nothing to do by read, watch the incredible American landscape roll by, and disconnect will be wonderful way to mentally reset as we make this transition.

If you are ever traveling through New York and would like to meet up, please let me know.

Visualizing A Decade Of Change In The Built Environment

a-decade-of-change-from-above.jpg

The movement of shadows is noticeable over the course of a day. Seasonal change is visible over a few months. However, urban scale change takes many years or decades to see the impact of new construction. The map above visualizes the newly developed land over the past decade. Often it is hard to comprehend just how much the city or town we live in evolves over time because of the slow pace of development. That is what makes the map and the images in articles like this, so fascinating. By stitching together before and after images over 10 years, it visualizes just how much some areas of the country have transformed over the past decade.

I encourage you to click the link to the article and scroll through the various topics that discuss themes of the decade of transformation in america.

Change can seem slow. A new building rises, one floor at a time. A new subdivision breaks ground with two homes, and then four. A new transit line is planned, and years pass. What it all adds up to can be hard to see.

- A Decade of Urban Transformation, Seen From Above

One quick takeaway is how these transformations are related to our growing climate crisis. You can see green yards and pools pop up in the dessert, farmland scraped clean for suburban sprawl, and giant data centers replace forest. Most of this development is making matters worse and not the sort of development we need to see in order to combat climate change.

At least some of the image show densification of urban areas, replacing parking lots with new housing, and some infrastructure, like the Tilikum Crossing in Portland, that is dedicated to public transit hopefully helping us more away from car-centric lifestyles. Let's hope that more of this sort of change is what we see in the decade to come.

Why Everyone Should Consider Building an ADU

A modern Detached ADU in Portland, OR designed by Lucas Gray

A modern Detached ADU in Portland, OR designed by Lucas Gray

Across America, cities and towns are facing rapidly rising housing prices that outpace increases in salaries. This is causing a housing crisis where the average person can't afford to own a home and sometimes can't even find affordable rental units. This is a huge issue here in Portland, Oregon and the government and many passionate citizens are trying to develop solutions. Sometimes this comes in the form of publicly subsidized affordable housing, yet there is also a movement to address this through market rate solutions in the form of Accessory Dwelling Units or ADUs.

ADUs, sometimes called laneway housing, granny flats, DADUs, backyard cottages, and many other terms, is a small secondary house built on the property of a typical single family house. Although each jurisdiction that allows these housing types has different rules and regulations, for the most part they all lead to the same end result - more housing options in our neighborhoods while preserving neighborhood character. They add density in a sensitive way while giving homeowners the potential for rental income, and renters an affordable housing type in neighborhoods throughout the city.

There are three primary uses for ADUs. Many people build them to downsize their life. Perhaps their kids have left the house and they no longer need as much space. Adding an ADU in the backyard can be a great way to downsize your living space while renting out the main house to a new family to grow in. Another common use is for aging family members. Often ADUs are built for barrier free living and Accessibility for aging-in-place or multi-generations living together on a shared property. The third primary use is as a rental unit, either long-term rental or short-term (think Airbnb). For this last use, the benefit is that the ADU can provide additional income and help cover mortgage payments. This can help people afford to stay in their homes as costs increase, or allow young families to be able to afford buying a home in the first place.

ADUs are not allowed in all jurisdictions although they are growing in popularity and most cities and towns are considering ways to allow them within their codes and regulations. In Portland, ADUs are limited to 800sf in size and 20' in height. The goal being to keep the accessory dwelling a bit smaller than the main house. This still is enough space to have a very nice 1 to 2 bedroom unit. Within this size limitation, there are endless options and creative design solutions to make these projects wonderful places to live.

I have worked on more than 50 ADU projects over the past 8 years and have become an expert in designing creative small scale housing that still becomes a great place to call home. I love this project type because it addresses so many of the issues facing our cities - ADUs increase density, they are small and efficient homes and are inherently sustainable, they provide supplemental income to homeowners often preventing displacement and allowing people to stay in their neighborhoods, and they are fast paced design projects that allow for creativity and experimentation.

A full sized kitchen with custom cabinetry fits nicely into this 700sf ADU.

A full sized kitchen with custom cabinetry fits nicely into this 700sf ADU.

Working with people of all backgrounds that are interested in ADUs is one of my passions. I love education people about the opportunities and challenges of these project types and answering questions about cost of construction, how long it takes to design and build an ADU, and design regulations that affect these projects. Please feel free to reach out if you are considering one of these projects on your property. I’d love to help.

Although ADUs are small projects, they are still complicated and need a close attention to detail to make them successful. This is another reason why reaching out to an experienced design team is important to achieve a great ADU. Fitting all the parts of a full house in an 800sf size is challenging and needs some creative space planning. I have many examples of ADU designs, floor plans, and other resources that can help inform your thoughts as you consider adding an ADU to your property. Using my breadth of experience I can help make your project be successful while balancing beautiful designs with functional layouts that meet the project budget.

A spacious ADU bathroom with no threshold shower designed for barrier free living and aging in place.

A spacious ADU bathroom with no threshold shower designed for barrier free living and aging in place.

ADUs can come in a variety of styles to fit your needs, taste, and the context in which they are built. Some places have restrictions on what they can look like, but for the most part ADU designs can be traditional, modern, or any aesthetic that you would like. The options are endless and they can be custom designed to address your unique lifestyle and tastes. If you are considering an ADU, I am available to help guide you through the design, permitting and construction process.

Kansai Architecture Tour: Osaka, Kyoto, Nara and Kanazawa

Started by Tom Heneghan and first updated by Lucas Gray in the summer of 2008
Expanded by Lucas Gray in the fall of 2017


Kyoto

We picked up a Wallpaper Design Guide to Kyoto. It is a great book that fits in your pocket and highlights interesting contemporary design in the area. A Lonely Planet guide was also useful but any guidebook would do. The information office in the station was also very helpful upon arrival.

Kyoto Station

The main atrium space is grand but poorly executed. The concourse is interesting in a way, in a fairly ludicrous kind of way. This building has the ambitions of the Tokyo International Forum but without the elegance, lightness, or intrigue. The most interesting part is the exposed fire escapes on the backside facing the tracks. The interior is often confusing and crowded although the crowds thin as you move up into the mall. It's strange to see such a high profile building fall short in so many ways. An architect given this commission has a responsibility to the public and in this case has really dropped the ball. There are too many horrendous buildings in our word and it is truly disappointing when the public gateway to a city joins the list.


Temples and Gardens


You’ll probably do the usual things - the stone garden at Ryoanji, Kinkakuji (golden temple), Kiyomizudera (wood temple on a hill). It doesn’t matter what you do - everything in Kyoto wonderful. Fantastic. But, I also recommend a visit to the Imperial Palace, in the centre of the city. It’s FAR more interesting than I expected. You must make a reservation to go there and you need to show them your passports. Inside the main walls of the imperial palace, near the north west gate is a reservation office. It is free to get into all of the sites run by this company, which is nice. You can also make a reservation there (with passports) to visit the legendary Katsura Imperial Villa Garden (at the edge of the city).

I liked the Imperial Palace because you learned about the architecture of the buildings – which were quite impressive. The guide was very informative. However, I felt the grounds, mostly just horrendously wide gravel roads, were poorly maintained and not very romantic.

Katsura was the opposite in my opinion. You were held back from truly experiencing the buildings. You got close to a couple of the small teahouses but the main buildings were always a little distant. However, the landscape design more than made up for this shortcoming. The grounds were truly stunning – this was probably my favorite garden in Kyoto.

Ideally, you should stay in a ‘ryokan’ (traditional inn) in the Gion district - which is the geisha district. These are, however, all a bit spartan and musty/dusty, and often full of German/Australian backpackers. I very much enjoy staying in the Sawai Ryokan, PROVIDING I can get the room at the front, on the second floor. You are kept awake by the noise of the bells in the hair of the geisha’s walking in the street below - which is an atmospheric way to be kept awake. (Address: 4-320 Miyagawa-suji, Higashiyama-ku, phone number: +81 75 561 2179 - The owner speaks some English.).

Another option is Iohari Ryokan, which was definitely not an architectural highlight although it was in a great location, on a metro line, next to a large bus station, and rather cheap (only 52,000 yen for two of us about 50 USD). Ask for a room that faces the courtyard garden. They also have free internet. Its right next to the Sanjo-Keihan Bus and Metro Station. You can book a room here at the Information Center at the Kyoto Station.


Contemporary Design

Ando designed an outdoor art gallery somewhere near Kyoto University but we didn’t go see it for some reason. It is probably worth the trip though.

The shops and cafes along Sanjo Dori were worth visiting. Many had great design. The Paul Smith Store was particularly interesting with a courtyard garden. Café Independants is in the basement of an old concrete building and was a cozy space to relax with a coffee, a light meal, or a beer. Nicely designed, especially the plants growing out of the old light wells around the walls. Located on Sanjo Dori a block after the covered arcade ends. Tel: 075 255 4312

Comme des Garcons has a store in Kyoto worth a visit. If you face Kyoto City hall turn left and go down two blocks. Make a right up the narrow road and it will be on your left about 75 meters up from the corner. It’s a big black façade with a curvy entrance. On the 5th floor of the same building is Yusoshi Café - a stylish place with a great Tuna, Rice and Wasabi Sauce dish. One of the Chefs, Futoshi, is a great guy who let us stay at his apartment for a week.

Down the street from Kinkakuji is the Insho-Domoto Museum of Fine Art. The building looks sort of like a Corbusier design but was actually designed by the Artist. I believe the art on display changes periodically.

I suggest you visit Tadao Ando’s ‘Church of the Light’, and also his ‘Temple in Lotus’ and ‘Yumebutai’, the latter two both being on Awaji Island. You may also want to go to his Church on Mount Rokko - the famous one with the glass tunnel - but I think it’s not as essential to see as the ones I mention above. You could see his ‘Church of the Light’, ‘Temple in Lotus’, and ‘Yumebutai’ in one day.


Tadao Ando’s ‘Church of the Light’

Ideally, get there around 10.00am on a sunny morning, since it’s designed to work best during the Sunday morning services that begin at that time. We actually attended the service, which was a pleasant surprise. The people were all friendly and welcoming and were rather knowledgeable about the building. There were also many other architect pilgrims in attendance and we made a bunch of friends who we later met up with when we arrived in Tokyo. The service starts at 10:30 sharp. Please phone the priest first, and say some simple English like “I am an architect, please can I visit the church today at ..... am/pm” (Whatever he then says, go anyway...we didn’t say that!). Phone number: 0726 27 0071

Go from Kyoto station to Ibaraki station (Train journey = 25 minutes)
Exit the station on the northeast side - the right hand side of the track if coming from Kyoto - into the main bus-terminal plaza. Take bus number 2. Ask bus driver for: “KASUGAOKA KYOKAI” (kah-soo-ga-oh-kah kyo-kai) and/or “KASUGAOKA KOEN” (kah-soo-ga-oh-kah ko-en), or you could try “Church of the Light”, since they’ve had tens of thousands of foreign architect visitors traveling the same route. If all else fails, try “Ando Tadao” (honestly - that should be enough). Bus journey = 15 minutes. You get off the bus when it turns sharp left, after it has traveled in a generally straight line from the station. (Stay close to the driver - he’ll help you.) From the bus-stop walk back to the corner where the bus turned left, and look left - you should see the church, about 50 meters down the road. After visiting the church, go back to the same bus stop, and take the next bus - the bus route is a loop, with the church at it’s furthest point, so any bus will take you back to the station. The address of the church is: 3-50 Kitakasugaoka 4-chome Ibaraki, Osaka


Tadao Ando’s ‘Temple in Lotus’ and ‘Yumebutai’

Both are on Awaji Island, which is connected to the mainland by one of the longest bridges in the world. You should ask tourist information how to get a bus to ‘Yumebutai’, which is fairly famous.

Yumebutai is a huge development, every part (except the hotel interiors) designed by Tadao Ando. It is essentially a huge parkland, (planted gardens and water gardens), in which Ando intends his buildings to be less dominant than the planting. From the hotel, you can probably get a taxi to Tadao Ando’s ‘Temple in Lotus’, which is nearby. You should first telephone the temple and ask if you can visit. Tel number: 0799 74 3624.

If you decide to go to Ando’s ‘Church on Mount Rokko’, take a JR (Japan Railways) train to JR Rokko-michi station (maybe 45 mins from Kyoto), and from there take a bus for 20 mins to ‘Rokko Cablecar Station’. Take the cablecar up to the top of the mountain (15 minutes), and walk 20 minutes to Rokko Oriental Hotel. The church (which is not a real church but a wedding chapel) is in the back garden of the hotel. Phone the hotel first: tel: 078 891 0333.

Nara

Visit Arata Isozaki’s new Convention Centre, next to JR Nara station - one of his best works, a black elipse with black roof tiles that echo the roofs of historic Nara. Try to get into any interior spaces. The trashy hotel next to the convention centre, which looks like a very bad Aldo Rossi, is, in fact, one of Rossi’s last works. The apartment buildings also adjacent are by Kisho Kurokawa.

Todaiji

One of the largest wood structures in the world - and absolutely amazing! One of the most awe-inspiring buildings I have ever visited. It is a truly impressive structure housing a massive Buddha. I thought I had seen all the Buddha’s I’d ever want to see after spending a year in Thailand but this was a pleasant surprise. Also of note, there is a gate you pass through before you get to the pay area. Make sure to look to your right and left as you pass through – there are two gigantic guardian sculptures carved out of wood. They are immaculately detailed and truly stunning. Definitely a “must see”

The deer populating the areas on this side of town are also enchanting for a little while. They are docile enough to pet. They do get annoying if you are trying to snack outside though.

I would suggest doing Nara as a day trip from Osaka. It’s only about a 30 minute train ride and there isn’t that much to see other than Todaiji and the temples that dot the surrounding park. There are supposed to be some nice walks in the hills around the city if you do spend the night.

Osaka

Osaka is a very gritty, and therefore very exciting city. Probably a city to be lived in rather than just visited. The easiest way to get a feeling for its style is to head for the Nanba district, at night, and just follow the crowd. Of course, the impression you get depends on which crowd you follow. Follow the most interesting-looking people.

You could go up the Umeda Sky building, near to JR Umeda station, designed by Hiroshi Hara - a very ‘fluffy’ derivative of The Grand Arch in Paris. Umeda station is also called Osaka Station. That’s where all the usual JR trains run to/from. The ‘Bullet Train’ (Shinkansen) runs to/from Shin-Osaka station, which is near the edge of the city. (Similarly, near Tokyo there is JR Yokohama station, and JR Shin-Yokohama station, where the Shinkansen stops).

You can visit Renzo Piano’s Kansai Airport - get JR train from JR Umeda station - or go by a kind of ‘Batman-style’ private railway train - from near to Umeda, I think. Or, there must be busses, or hotel courtesy busses. Remember - there is ALSO an airport called ‘Osaka Airport’. Renzo Piano’s is called ‘Kansai Airport’.


Suntory Museum and Aquarium

In Osaka, take the Midosuji subway line and change at Honmachi station, onto the Tyuoh Line (could also be written Chuo Line), heading to Osaka Port station, and get off there, at the terminus. Follow the crowd, or ask directions to the Suntory Museum (by Tadao Ando - an un-typical work by him - the interiors are not all by him). Next to the Suntory Museum is a foul-looking box building with red corners, which is the Osaka Aquarium by Cambridge Seven Architects of USA. Absolutely foul building, but a really very excellent aquarium inside.

See also:
archinect.com feature article

There is a district in Osaka that used to be an area for antique furniture, or so we were told. Now most of the shops have been converted into trendy clothing stores and small cafes. A lot of the interior design was great and some of the new structures were fantastic. The “Hysteric Glamour” shop was an interesting design - the men’s section is a metal box floating over the concrete women’s section. The entry sequence is rather fun as you are climbing up the folding concrete and catch glimpses of the interior. I’m not sure who the architect was for this building.

Another fun building is called the Organic Building. If you are facing the corner of the Apple store walk down the side street 1 block and make a right. Walk up about 2 or 3 blocks and you will see it on the right. It is a rust red colored building with large “ducts” coming out of each panel – the ducts are flowerpots with all sorts of plants growing out. Again, not sure who the architect was for this project but it was perhaps my favorite building in Osaka.

Kanazawa

Another nice city to visit if you have a rail pass – it’s a few hours from Osaka/Kyoto on the high speed trains. The main reason to visit is the Museum of 21st Century Art designed by Tokyo based SANAA. It is a fantastic building with a great concept and intriguing exhibits. The plan consists of a large circle containing boxes that become the galleries and courtyards. The left over space becomes circulation and most of it is open to the public even when the museum is closed. It’s a fun building to wander through. The galleries are interestingly laid out, varying in size and height to create a fascinating circulation sequence in the negative spaces. It’s hard to describe but definitely one of my favorite buildings in Japan.

Across the street from the museum to the north is the Old castle with its sprawling grounds and a large traditional garden. It is worth spending a couple hours at each on a sunny afternoon. A few blocks to the west is a great town market selling all sorts of fresh produce and seafood. There are a bunch of great and cheap sushi restaurants there for lunch/dinner.

Conclusion

I was pleasantly surprised how affordable the trip was. You often hear that Japan is ridiculously expensive. There were parts of Tokyo where the price was prohibitive but in general I never felt like something was priced out of my budget – which was small. We lucked out by finding hosts through couchsurfing.com that opened their homes to us for one week in Kyoto and 5 days in Tokyo. This saved hundreds of dollars and gave us an insider’s view of the cities. I would highly recommend going this route. Otherwise, the food was fantastic and affordable and our biggest expense was train rides.

Japan is a fascinating place with an amazing blend of contemporary design and historic sites. I was there for three weeks and felt I could easily have spent another month or so without seeing everything I wanted to. I can’t wait to return and see more of the stunning landscapes and interact with a vibrant and beautiful culture.

Tokyo, Japan Architecture Tour

Started by Tom Heneghan and first updated by Lucas Gray in the summer of 2008
Expanded by Lucas Gray in the fall of 2017

tokyo-rooftop-mt-fuji-view.jpg

Tokyo Guidebooks:

I tend to not rely on guidbooks anymore considering all of the online travel information - and google maps works great in Japan. However, it has been suggested to get hold of the small pocket guidebook to Tokyo architecture, written by Noriyuki Tajima - available here on Amazon. There is a very useful map that goes with it, however the map is not included in the book although the map publisher is mentioned. It is a bit dated but still is a great resource to see some contemporary architecture. The Wallpaper Tokyo Design Guide published by Phaidon is also a worthy investment. It was a nice little book that has good tips on designy places to see, shop and sleep – especially if you have a large budget as it is definitely higher end focused.

I still question whether you really need a guidebook at all. With ample internet access and google maps you can probably find anything you need on your phone. There are plenty of online resources for architecture worth visiting and reviews of restaurants across the city. Google maps is actually really great in Tokyo and can offer everything from directions, train schedules, recommendations for restaurants, and more.

When you arrive, buy a copy of the English-language magazine 'Tokyo Journal', which lists festivals, events, parties, etc. It is most likely only available in districts where foreigners are. There were also a couple of free English language weekly magazines with events, concerts, gallery openings, etc. These can be found in many bars/cafes and probably at the information centers.


JR Rail Pass

I always purchase a JR rail pass ahead of each trip to Japan. It is a bit pricey (approximately $415 for two weeks or $535 for three) but definitely worth the investment. It gets you on almost all of the JR trains, including the high-speed Shinkansen lines. It makes moving around the country fast, convenient, and affordable. You have to purchase the pass ahead of time online. I've used japan-rail-pass.com in the past and have been satisfied. It will ship to your address by FedEx and then you take it with you and exchange it for the actual pass on arrival. If you land in Narita, follow the signs to the trains and there is a JR East ticket center. Bring your receipt there and they will get you the pass. You can exchange it at an JR Ticket center in almost any train station.

The train from Narita to Tokyo is around $28 each way. Just getting to and from the airport will cover a large percentage of the purchase price of the JR Pass. I also find that the JR Yamanote line is one of the most convenient ways to get around Tokyo and your JR pass will get you on there for free as well (a one-way ticket will be around $2). On a recent trip I spent about $30 on subway tickets over the course of 4 days. You can probably get almost anywhere you want to go using the Yamanote line and then a short walk if you are on a budget and willing to take a bit longer to get to your destination. A Shinkansen ticket from Tokyo to Osaka will run around $140 so you can see that the pass can save money if you travel beyond Tokyo.


tokyo-skyline.jpg

Arrival

Most flights land in Narita, about an hour by train outside the city center, although they are moving some of the international flights to Haneda which is much closer to the city center. There are two trains that can easily get you into Tokyo - the Narita Express, which is run by JR Japan Railways, and which goes to Tokyo Station, and the Skyliner, which goes to Ueno Station. I usually take the Narita express and then transfer to a subway or the Yamanote JR line once I get to Tokyo station. The Narita Express is covered by the JR Pass the Skyliner is not.

You can buy tickets for both trains either in the arrivals hall, or downstairs in the station.

One tip: if possible, avoid getting the Narita Express to Shibuya station, unless you have been advised to do that by someone. The location of the Narita Express Shibuya Station is very distant from the regular Shibuya Station - a real pain when you're hauling a bag. If you need to transfer to a regular JR line, or to the private Metro subway system, or to get a taxi, I suggest changing at a different station, such as Shinjuku or Tokyo Station.


Accommodation

Somewhat surprisingly, hotels in Tokyo are very affordable. Of course you could get super expensive luxury places but you can still find lots of nice options in the $100 range. Business hotels are no frills but offer everything you need for a pleasant stay. If you want a unique experience you could try a capsule hotel. There is a nicely designed chain called 9 Hours (https://ninehours.co.jp/en/). They have a few locations around Tokyo, and in other cities. They also have some locations for women only. It is a cool experience and the interiors are elegantly designed with great infographics. They are also under $30 per night per person. So if you are traveling alone it would be a great affordable place to spend a few nights.

If you are looking for a more unique, Japanese experience, I highly recommend a place called Andon Ryoken. It is near Minowa, two stops north of Ueno Park, on the Hibya line. It’s in a quiet neighborhood about a five to ten minute walk from the station. Also I found that the Hibya line connects almost all of the sites you want to see. It was definitely the subway line we used the most. Andon Ryoken was featured in a 2005 Japan Architecture Guide. It is a small boutique hotel, very elegantly designed and very affordable - about 80 dollars a night. As with all Ryoken, it had Japanese style rooms with tatami mats and futon mattresses and shared bathrooms with decorative stalls. The rooms are very small but nice. They had very a nice Japanese bath on the top floor, free Internet, and a good cheap breakfast. They have an easy to use website and usually fill up quickly so reserve well in advance. www.andon.co.jp. This is a perfect place to stay if you want to experience a Japanese style room (futon mattress on tatami mats) although I have to stress the rooms are very compact.

The neighborhood around Andon Ryoken is relatively quiet and residential. If you head south of the guesthouse towards Asakusa there are commercial streets with lots of restaurants and cool local bars. The whole area around Asakusa has tons of restaurants, shops and activity.

Otherwise, there are a huge range of hotels throughout the city. I would suggest booking a hotel that is a close walk to as many metro lines as possible to make moving around the city easy. If you can book one near one of the Yamanote line stations that would be even better. I like the small alleyways filled with bars and restaurants close to Shimbashi Station and there are many affordable business hotels in this area for around $100 per night. There are also affordable hotels just east of Okachimachi station. This area is also lively at night with bars, restaurants, shops, and pedestrianized streets.
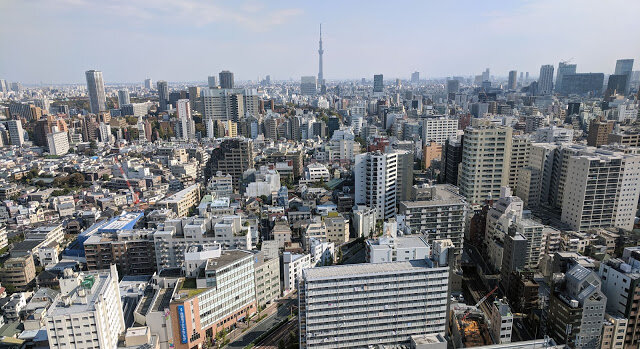
Verticality

I found that it took me a long time to realize that Tokyo and most of the larger cities in Japan, are stacked vertically with cafes, restaurants, bars, hotels, shops, etc. located on random floors in high-rise buildings. As you wander the streets keep your eyes moving up buildings to see signs revealing the plethora of business inside. This is quite a change from most western cities were usually only the ground and second floor are reserved for public functions with the higher floors usually being private businesses or residents. Most buildings will have a series of signs at their entrance also advertising the businesses within. It is a little daunting to take the plunge and head up these buildings, but there can be some great restaurants and cafes you would otherwise miss out on.

---

Ok, now onto the architecture and districts of the city you should explore!

Ueno Park (northeast of the central city)

Visit the Museum of Western Art by Le Corbusier, a simple and elegant building. The new basement galleries, however, are not by him and he must be spinning in his grave. Opposite Corbusier’s building is the Metropolitan Theatre, designed by Kunio Miyakawa, who worked for Le Corbusier. The Miyakawa looks like a Chandigargh design. Many people mistakenly think this is the Le Corbusier building. The Corbusier building looks dull on the outside, but is fascinating internally. Usually it is horrifically crowded, so avoid weekends. The new museum by Yoshi Taniguchi (who subsequently re-designed MOMA in New York), on the north side of the park - The Museum of Horiuji Treasures - is a ‘must see’, mainly for the fantastically arranged exhibition. The building, which is a very elegant design, shows the plusses and minuses of current Japanese architecture. It is sometimes very careful, yet sometimes bafflingly careless. Nearby is the National Children’s Library, which is Tadao Ando’s conversion of an old building, and worth a look. The garden design is simple, but surprisingly effective.

There is a new building that connects the elevated park to the street below. It is a shopping center with Bamboo in the title. I’m not sure who designed it but it was a nice building. It utilized an interesting juxtaposition of wood and concrete. The wood has aged to become a similar gray as the concrete while the concrete was made with wood board formwork, at points it was difficult to tell them apart.

I found the park itself to be a nice break from the hectic city. The large trees provided much needed cool shade and there were nice benches to sit and relax and a local amateur baseball game going on. I would recommend this as an itinerary for your third or fourth day in Tokyo when you are a bit tired from walking miles upon miles.

After visiting the park, you could walk through the nearby Nezu district, which is old, towards Nezu station. Together, this should take you most of a day, if you walk slowly and relax in the park.

The Shibuya and Harajuku District (southwest of the central city)

Start by visiting the Meiji Shrine (next to JR Harajuku Station). It’s not very old - built in the 1920’s, but its setting and the approach are superb. Then go to Kenzo Tange's nearby Olympic stadium. This can become a full day trip - spending the afternoon in Yoyogi park watching the groups of young people play games, practice dancing, play guitars, paint, do tug-of-war, and all sorts of other interesting things. It’s best experienced on a weekend.

Return to this area another day and down up Omote-Sando street heading away from the park. Head into the Oriental Bazaar building to buy souvenirs, foreigner-sized yukata’s and kimonos, and old – and very beautiful – bits of kimono cloth, especially from the section on floor 2, and wood-block prints from the stall next to the kimono stall. The Oriental Bazaar is not a rip-off as everything is at a reasonable price.

Continue up Omote Sando street and look at the new Dior building by Kazuyo Sejima from Sanaa. Go back down the hill about 20 meters and turn left into a small pedestrian street - informally called ‘Cat Street.’ On the right hand side of the street you will see shop called Kiddyland (originally it was the hhStyle furniture showroom) by Sanna, and a strange folded-steel annex building by Tadao Ando next door - now it sells artistically designed underpants. Yes....underpants. Both the Sejima and the Ando building are temporary structures, which anticipate the continuing massive increase in land value of the Cat Street area, and their eventual demolition for replacement by a bigger structure. When you are standing in the Sejima building, remind yourself that this is a 3-storey building built in the most seismically-active country in the world, and note the glass walls of both long walls and the tiny-diameter steel columns. The engineering is by Sasaki, who was also engineer for Toyo Ito’s Sendai Mediatheque. The Kiddyland building is a very clever structure, depending on a big concrete structure hidden behind a house on its Omote-Sando side. Being very lightweight so that earthquakes don’t have a lot of mass to shake around, consequently the structure doesn’t have to resist much earthquake thrust. Also notable are the ‘fire-escapes’ from the top floor, which are a kind of belt that lowers you to ground level.

Continue exploring this street for a while. There are lots of interesting designs – especially interior design – for the shops lining the alleys off Omote Sando. We took two full days exploring this district of Tokyo. Part of this is because I was working on a retail design project at the time but it is still worthwhile. There is a large green glass “Iceberg Building” a block west of this alley on a busy street. It is an Audi dealership and definitely an interesting design, with crazy angular glass planes, although the interior wasn’t spectacular and the building must be an air conditioning nightmare – the antithesis of sustainable design.

Return to Omote Sando and turn right and go up the hill to the new Louis Vuiton shop by Jun Aoki, and near the top of the hill you’ll find Toyo Ito’s new Tod’s shoe shop, which is a concrete box with the pattern of trees cut into it. He recently completed a new version on this theme, in Ginza, for the Mikimoto pearls company. I find the Ginza version far less interesting, however, and the gloss paint on the surface reveals it to be not as well built as one would expect.

The Tod’s and Dior stores were personal highlights, although the interior of Dior is a bit of a disappointment. They blocked almost all views of the façade and out onto the street with their typical gaudy baroque displays. The Tod’s interior was much more integrated into the architecture of the building.

An Interval to Talk About Food:

There’s a very, very, good ramen noodle shop, about 50 metres down the hill from Kiddyland (on same side as Kiddyland). Turn down the side-street called Onden Shopping Streer, just after the ‘Peltier’ shop, and the ramen shop is about 30 meters down this street on the left hand side. It’s not a very ‘traditional’ place, as it’s a bit styled-up, but the ramen is really very good. Just pick any one.

The next recommendation is one of my favorite places in the world. It will surely be demolished some day soon – maybe even before you read this! The route is a bit complicated, so bear with me. Walk about 50 meters down the hill from Kiddyland. Stand with your back to the ‘Peltier’ shop. If you look across Omote Sando main-street you will see a small side-street directly opposite you. That is the street you want to go to. Cross Omote Sando by the footbridge, or some other safe way, and walk into that street. Keep going until the street ends at a small cross street. You then walk a few steps left and turn right, almost immediately, into another small street. Walk along that street until you get to a weird, multi-colored building covered in scaffolding. That is a collection of ‘rental galleries’ where kids of questionable artistic talent display their works. There’s no need, and no pressure, to buy anything. Just nod appreciatively. The place to eat is behind the gallery building. You can get to it by walking around the ends of the gallery building, or through some of the bottom-floor galleries. It’s a small, traditional-ish building where you can only buy ‘Okono-miyake’. It’s a kind of Japanese-pizza, that you cook on a hot plate built into your table. You can get meat style or squid style, etc. It’s good – not great but definitely interesting – in taste, but the place and other clientele are great. You can also get to this place by walking along the street that runs parallel to the one that took you to the galleries building. But, it’s more fun to enter through the galleries route. You can return to civilization by walking from the restaurant to the parallel street.

Back to Architecture:

On the left (north) side of Omote-Sando, while you have been walking up, you will have noticed a shopping building of extraordinary length. It replaced historic government-owned low-income housing that stood on this site until about 2002. The design of the old housing is said to have been influenced by Frank Lloyd Wright…and the rumor was elaborated by reference to FLW’s many visits to Japan. The claim is doubtful, I think. Anyway, the old housing was much admired for its romantic squalor. It did not meet any earthquake regulations, or modern functional requirements, but its replacement was a ‘hot potato’ project, which not all would have had the guts to take on. Tadao Ando had the guts.

The vast building is elegant, but not a show-stopper on the outside, and my hunch is that that is the way Ando wished it to be. Omote-Sando is already a zoo of architectural exhibitionism, and something restrained is necessary as a ‘visual anchor’, or to enable your eyes to draw breath. This is a very important street – one of the most important in Tokyo - and Ando’s project gives it some of the ‘gravitas’ such a street needs. The ‘spiral street’ inside Ando’s building is incredibly successful. It’s a bit like a long, thin New York Guggenheim building, but with the ramp lined by commercial businesses (and – anyway – isn’t the NY Guggenheim a commercial business?). The Ando spiral street really works. It’s worth a look, just to see how it re-invents the commercial building-type. It also is a good example of the exquisite use of concrete that Ando’s reputation is built on.

At the top of Omote-Sando, on the left hand side, is a building by Kengo Kuma which is also restrained, and which interestingly exploits the fact that on its eastern side is the territory of a small shrine and a police-box, and consequently the Kuma building will never be enclosed on that side - or not for very many years. Kuma exploits this by some gymnastics facing towards Route 246. From here, go to the top of Omote Sando, cross the road, turn right, and visit Fumihiko Maki's Spiral on Aoyama street (Aoyama-dori). Go up the spiral at the back of the building to see the good selection of ‘designer-toys’ in the market on floor 2. Exit the market at the front of the building, opposite end from the ramp, and find one of the finest internal public spaces in Tokyo – a series of bench seats on stepped landings, overlooking the street outside, usually occupied by sleeping shoppers.

Turn right as you exit the Spiral building and go back to Omote-sando crossing, and turn right - walk up this street, which has all the major designer fashion shops. Check out Comme de Garcons - exterior by Future Systems, interior by Rei Kawakubo, which is very brilliant, I think. However, she changes the interior every few years, so it’s anyone’s guess what you’ll see. But, it’s certain to be brilliant. She has repeatedly destroyed brilliant interiors, only to replace them with brilliant interiors). Go into the various Issey Miyake shops, and the Yohji Yamamoto shop, which he apparently designed himself..

As you walk along you’ll find Herzog & de Meuron’s Prada store. I feel it is the most successful integration of interior and exterior design of all the shops in this area. Go into the change rooms and check out the button on the floor that runs an electric current through the glass and turns the transparent wall into an opaque surface to create privacy. I even found the landscape design around the store to be great. Also, the entrance/exit from the basement of the building through an underground stair to the “secret cave” entrance is playful and fun.

It is also worth exploring the alleys around this part of Omote Sando. Go behind the Prada store and you get to a nice little complex of well-designed shops. The “A Bathing Ape” shop in particular is worth visiting for the sushi-style conveyor belt of shoes and a glimpse of Tokyo youth fashion style – the whole store is an example of great retail design. The Kate Spade NY store across the street from “A Bathing Ape” was still under renovation when I was there but the metal mesh wrap over a more traditional house was interesting – and it should only get better as more vines creep up the mesh. Continue up Omote Sando from the Prada shop and stop in at Tadao Ando's 'Collezione' (not his best work).

The way to end the Omotesando tour, after seeing Ando's Collezione, is to go to the nearby Nezu Museum. This is a massive re-working, by Kengo Kuma, of an old building. The re-worked buildings are excellent, and the old, traditional garden is superb, but....the small cafe, standing in the garden, is brilliant. One of the most lovely buildings I've seen. One of Kuma's finest works. After the blizzard of form-making excess that is Omote-sando, this simple building gets its effect from its materials, it's simple form and its superb detailing (although I say that nervously, knowing that contemporary Japanese architecture is rarely detailed to endure. My fingers are crossed, though, that this work will retain its pristine beauty). And, the food and coffee is nice, and not too expensive.

Return to the Omote-sando crossing, and turn right, along Aoyama street, and turn left at the Bell-Commons corner – perhaps a 5 minute walk up Aoyama. Bell-Commons was designed by Kisho Kurokawa, but is not worth more than a glance. The street that you turn into at Bell-Commons - like most streets in Tokyo - has no name. But, it has a nickname, which is ‘Killer Street’ - referring to the prices in the shops that lined the street when it was first built as a route to the stadiums used for the Tokyo Olympics in 1963. It’s gone a bit downhill since then. Go along Killer Street and look at Mario Botta's Watarium museum and the FANTASTIC tiny rough-concrete Asusa House opposite. There is also an interestingly designed colored concrete school across from the Watarium Museum and if you can talk your way inside – or visit on a Sunday – there is a fantastic concrete church hidden behind.

Cut North through the backstreets - walk away from the face of the Watarium building - and try to find your way to Fumihiko Maki's Tepia museum, which has amazing detailing, and sometimes an interesting computer exhibition. If you stand with your back to Tepia, cross the road and walk left until the last (small) street on the right before the big Route 246. Turn down that small street and keep looking down the small streets that lead off it on the right-hand side. Soon you will see Sejima’s ‘Small House’ down one side street. If you go further along the small street (not the side street) you will find a Temple-approach gateway on the right. Go in and walk to the right side of the Temple. From there you will get a good view of the private side of Sejima’s ‘Small House’. There are some problems, I think - such as a fully glazed exterior facing the afternoon sun, and little insulation for hot or cold, and the problems of hanging curtains, which tend to fall vertically when the glass walls lean in and out, and the curtains are the only apparent means of privacy and insulation. Return to Tepia, and head west, downhill to Maki's Sendagaya gymnasium, which is close to Sendagaya station. This takes most of a day, and gives sore feet. It is probably worth breaking up into at least two trips.

Ginza (east central)

Go to Ginza Station (on Ginza Line, Maronouchi Line or Hibiya Line), come out of the station at the Ginza-crossing, and look for the second Dior Building, by Kumiko Inoue - she did the perforated metal exterior wall, not the interior. If you walk past Dior, about 75 meters down, you’ll find the Hermes building by Renzo Piano with an amazing Glass Block Facade. Cross the main road and walk down any street at right-angles to it. Go down 2 blocks, and look left or right and you should see Toyo Ito’s Mikimoto pearls Building.

At this point you’ll start to wonder about the legacy of ‘Modern Architecture’. Le Corbusier built for the Salvation Army and did low-income housing; the Smithsons did schools and housing, Mies and Kahn did universities. Tange did the Hiroshima memorial, etc, but today’s ‘keynote’ architecture is for Dior, Louis Vuiton, Hermes, up-market furniture shops and Mikimoto Pearls. On Sundays, the main street in Ginza is pedestrianised (or was at last time of hearing), which is quite charming.

Just southeast of Ginza is the Tsukiji Fish Market is an amazing sight. Hang around for a while and eat ridiculously fresh sushi for breakfast. I got there around 6 and felt it was already a little too late. The earlier you can make it the better. I recall hearing there is a fish auction at 5:30 when all the top restaurants in town bid for the best cuts of meat. I would recommend planning on going to the market on the morning of your first day. Due to time differences from the US, you will probably wake up very early anyway making this a great first destination.

(Note: they have been talking about relocating the market for many years now. I'm not sure when it will actually move to the new location. Also, they have been cracking down on tourists wandering through the market. I think they may not let tourists in before a certain time. However, the restaurant stalls around the market are open to visitors.)

Have a look at Kurokawa's famous Capsule Tower, nearby. Right across the street from it at Shiodome, is a new high-rise office building designed by Jean Nouvel - a very elegantly curved building with great glass facade overlooking the Hama Rikyu park.

At 10am go into nearby Hamarikyu park – there is a fee to enter but worth it in my opinion. I went into the Tea House in the park and had a lovely relaxing time sitting on the balcony overlooking a tranquil lake sipping green tea and tasting a jasmine cake. Definitely worth a stop if it is hot or you need a rest after the early morning market. From inside the park you can catch the riverboat, to Asakusa. Visit the amazing Asakusa Kannon shrine, which is a popular tourist destination. There is a long market street leading up to the shrine with hundreds of vendors selling souvenirs and snacks. Just south of this market is the Asakusa Visitor center designed by Kengo Kuma. It is a great building with a cool facade treatment with wood screens unifying the shifted geometry of each floor. To the east, across the river is Phillipe Starck's 'Flame d'Or' bar/restaurant with the gold ’flame’ coming out of the roof. You can see it from afar and it probably isn't work going to unless you are a huge Phillipe Starck fan. This will take you till early afternoon.

Roppongi Metro Station

Come out of the metro and walk north and check out Tokyo Midtown complex and includes the Suntory Museum by Kengo Kuma. Also check out the 2121 design site right behind it, designed by Tadao Ando and fashion designer Issey Miyaki. Keep walking up the main street and look for a gas station on the left hand side. Turn down the side street and after a 5 minute walk you will find a beautiful museum which is the last major work by Kisho Kurokawa. It's notable feature is a curvy glass façade with thousands of glass louvers – the main atrium is impressive and the museum hosts some impressive exhibits.

Go back to the main road and walk north until you get to the Toto building. On the third floor is the Gallery Ma architecture gallery with ever changing exhibits. There was a Glenn Murcutt exhibit when I visited. On the second floor is the Toto architecture bookstore with a great selection. The gallery is free and you can check out the current exhibit here:
https://jp.toto.com/gallerma/index_e.htm

Central Tokyo

Have a look at Tokyo International Forum, designed by Rafael Viñoly Architects, which is next to Yurakucho station,

O-daiba ‘island’

You get here by ‘Yurikamome’ monorail from Shinbashi station. We went to the islands at dusk to get dinner and watch the summer fireworks festival. We also let the first train load up and leave so we could be first in line for the next train and get the seats in the very front of the first car. This gives you a spectacular view out the front window as you fly along the tracks (it is a driverless monorail).

O-daiba ‘island’ is an artificial island formed of piled up garbage. It’s the first of the artificial islands that were planned for Tokyo Bay by the late Kenzo Tange, but since the population of Tokyo is no longer increasing at the rate it was, the islands may no longer be needed. O-daiba is a very enjoyable ‘trashy, commercial kitsch’ place to go – every visitor enjoys it (even extremely distinguished architectural academics). Go to the end of the Yurikamome line, have a brief look at ‘Tokyo Big Site’, which is a huge exhibition centre that incinerated – and continues to incinerate – huge amounts of Tokyo tax-payer’s money (interestingly, it’s located close to one of Tokyo’s main garbage incineration plants – a not-badly designed building with a huge concrete object, which is its chimney.

Walk back under the Yurikamome to see the Toyota car museum (actually extremely interesting) and ‘Venus Fort’ – a huge shopping center designed for women, which looks like nothing from the outside, but is Milan inside, complete with interior lighting programmed to simulate changes in exterior daylight - totally ludicrous, but beautifully done, and very enjoyable. Then back to ‘Decks’ shopping center – which is just a shopping centre, but immense fun. From its decks you can watch the beautiful people on the artificial beach, below, all sensibly staying out of the polluted water. Next to ‘Decks’ is a large-scale model of the Statue of Liberty, given to Japan by the French government during ‘The Year of France in Japan’, some years ago. It faces inland, so photographs of groups can be taken next to it, rather than out to sea, as does the original.

Outside Tokyo

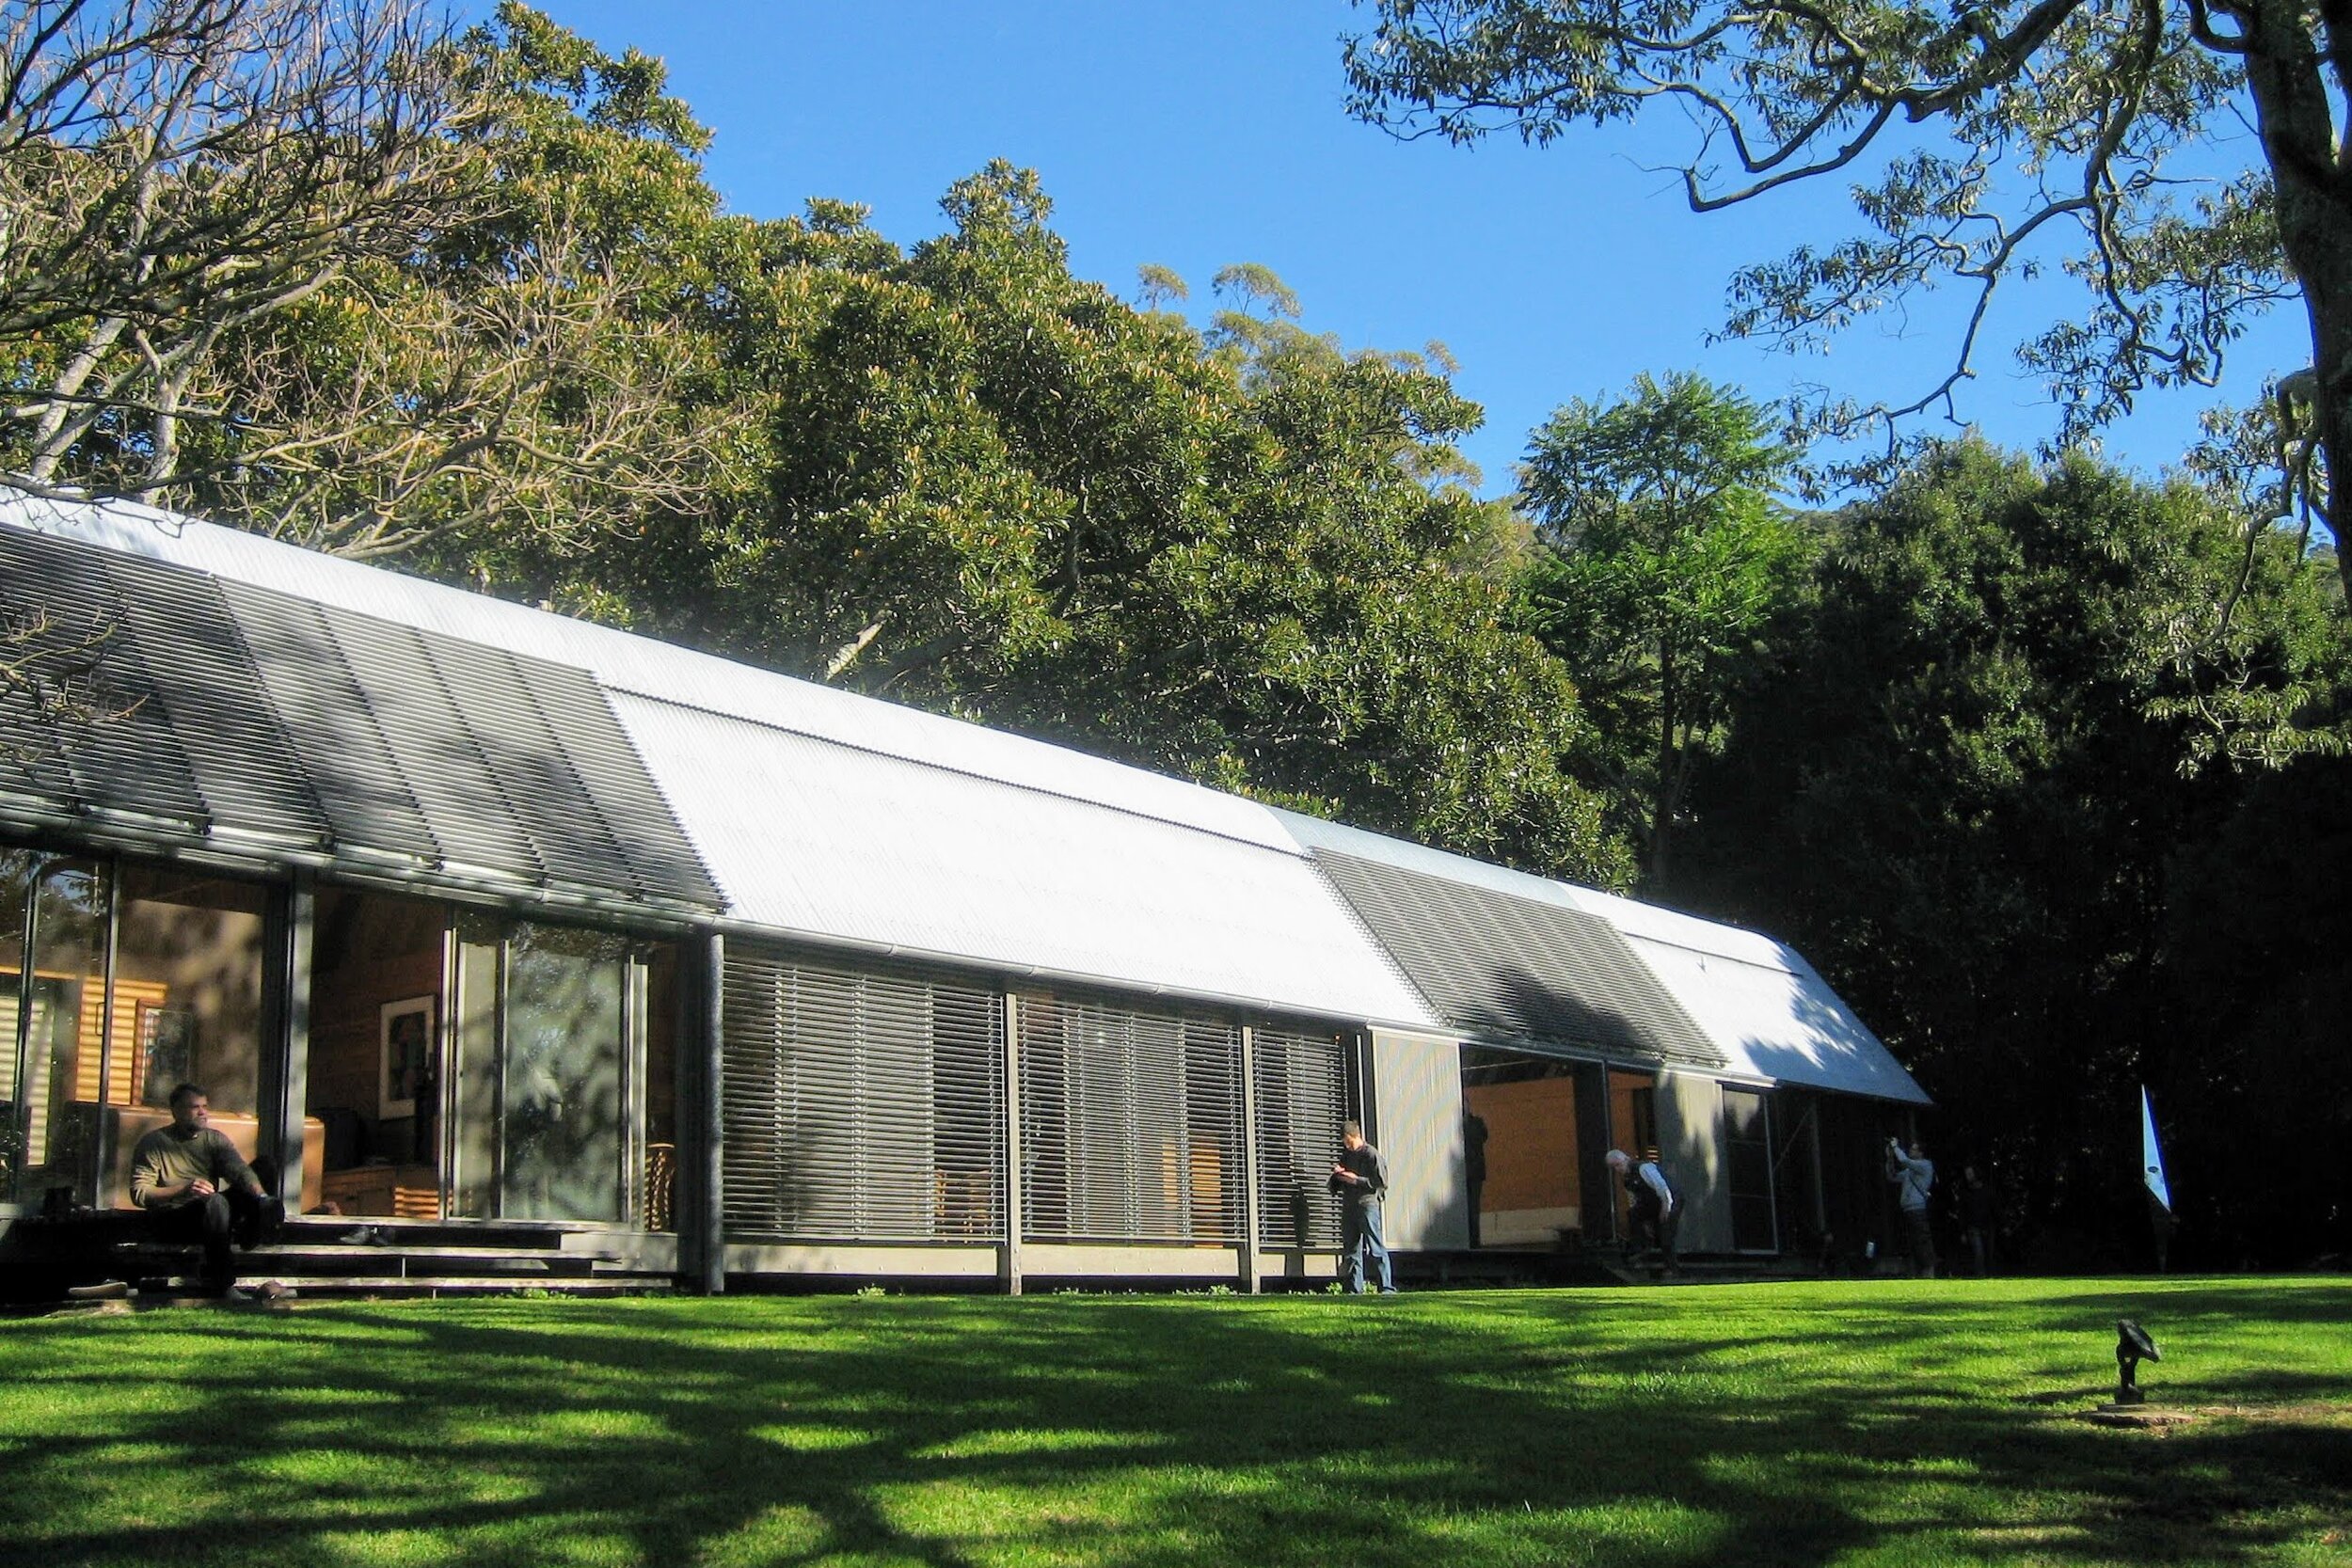
A day in Kamakura is very good - get there by ordinary train from Tokyo Station or Shinagawa Station (you can use a JR rail-pass for this journey, and all journeys above ground in Tokyo). See the very, very, very, brilliant Kamakura Modern Art Museum (one of my favorite buildings in the world) designed by Junzo Sakakura, who worked for Le Corbusier in Paris, and the big temple (Kamakura is full of temples). Get the bus from the main street in front of the temple to Kita-Kamakura station and visit the temple there, which is an immersion in Japan at its most idiosyncratic. Then catch the train from there back to Yokohama, and have a look round - maybe spend evening in Yokohama's Chinatown, which is close to the International Ferry Terminal by Foreign Office Architects, which does not serve up quite the spatial experience that I hoped for.

Another good day or weekend trip is the town of Nikko, a couple hours north of Tokyo. Although it is a popular destination for Japanese tourists, it is quite beautiful and if you take a bus out of town further up into the mountains there are some amazing hikes.

West of the City Center

Go to the Shindaita station on the Keio commuter train line and walk a few blocks north and then a few blocks west to visit Hanegi Forrest. This building, designed by Shigeru Ban, is an apartment complex where the building “makes way for the trees.” The building is lifted up on stilts and large holes are cut through it in order to let the existing trees continue to dominate the site. The annex building is rather odd and space-like and hasn’t aged very well. Rumor has it Shigeru Ban actually lives here.

Across the street is another Apartment complex that has a very nice elegant design. Not sure who the architect is but there is a nice use of concrete with vines growing up the sides and wood log walls. If you continue walking south and west from here to the next subway station on the same line (Higashimatsubara) you can visit Shigeru Ban’s office.

Northwest of City Center

St Mary's Cathedral designed by Kenzo Tange. This is an incredible concrete structure with sculptural metal roofing that soars into the sky.

Architecture Galleries

In Tokyo there are two main architecture galleries, both with nice bookshops: The GA Gallery in the Harajuku district, and Gallery Ma in the Nogizaka district. Both do not always have exhibitions so check before going.

GA Gallery
Ga Gallery website
(03) 3404 1461

Gallery Ma
Gallery Ma website
Click 'english' and then 'information', to see the map.
(03) 3402 1010

Sports

We went to Tokyo Giants Baseball game at the Tokyo Dome. It was a great evening activity that let us get off our feet for a few hours. Also the Japanese fans have a unique and rather charming way of participating in the sporting event with non stop singing, drumming and dancing. The beer girls are reason unto themselves to visit. Hundreds of Japanese girls run up and down the bleachers for three hours with kegs strapped to their back pedaling Suntory, Asahi, and other cold Japanese beers on draft. The building itself is nothing very exciting – basically a huge concrete structure with an aging dirty roof. But the area right around the stadium is an amusement park complete with rollercoaster twisting, turning, and flying right through the mall across the street. It is kitschy but kind of fun at the same time.

Generally

There isn't as much good architecture in Tokyo as you'd expect. The 'big guys' have built very little here - Isozaki has built only one or two, Ando only a couple of big ones. Maki, however, has many good buildings in Tokyo. The best works in Japan are usually outside Tokyo. The Tokyo International Forum (by Rafael Viñoly) is very impressive until you try to walk to a theatre door - then you find pinched, cramped, mean and frankly dangerous circulation spaces. But, the Forum is fun - so is Le Corbusier's museum at Ueno, and so is Kamakura. For enjoyable trash, see Odaiba - especially 'Venus Fort'. And (don't sneer) - Tokyo Disneyland - just at the edge of Tokyo - is really fantastic. It's a big surprise, especially to arrogant architects who despise kitsch, but end up having a great time no matter how hard they try to despise it. Tokyo Disney Sea (next to Tokyo Disneyland) is a brilliant piece of design. I mean, brilliant! Zillions of people would go, whatever it was like. Disney didn’t have to make it this well designed or this well built. They must have done it like this because of pride, which – these days – is a virtue, not a deadly sin.

Overall, what is great about Tokyo is the urban fabric itself rather than any individual building. Wandering the streets and alleys, getting lost in the metro system, finding your way to the tops of buildings (there are a few free observation decks), and squeezing into Yokocho (tiny alleys near train stations filled with bars and food stalls), is what makes this city so special.

Place To Drink

No visit to Tokyo is complete without a visit to the legendary Golden Gai near Shinjuku. ‘La Jetee’ bar iis highly recommended - it is run by a wonderful lady named Tomoyo, who speaks several languages – all with a French accent. Architect’s patronize it a lot - including Itsuko Hasegawa, Toyo Ito, and others occasionally drop in. It’s tiny. When you go there you’ll wonder why I have sent you there. Then, you’ll have a drink (ideally sitting at the ‘banquette’ seating around the tiny table), and slowly you’ll see why it’s the most perfect bar in the world. It fits like a glove. Tomoyo (or her stand-in) will serve you some bits of food. It opens at 9.00pm. If you enjoy yourself too much and stay until the early hours it can be a bit expensive. But, if you leave before you get too ecstatic it’s not too bad. And, it’s worth it for the experience. Tomoyo knows that many of her customers are artists/architects/odds-and-ends who don’t have much money, so don’t be afraid to tell her that you can only spend 5000 yen, or so, and what can you have? (but make it clear that that’s for all of you, not each). I believe there is a 1000 seating fee and then the cost of drinks on top of that. I suspect that you can have a nice time there for 3000 – 4000 yen each. It’s almost impossible to find – see the web-articles below:

Tokyo Feature Stories

Tokyo Nightlife


Basically, walk along Yasukunni Dori, away from Shinjuku, and turn left down a little alley through a small park just east of Mr Donut. This leads into an area called Golden Gai with a handful of tiny alleys filled with tiny bars and restaurants. Her bar is on the second level of the third alley down, on the right hand side. Or when you get to the entrance to Golden Gai phone her and she’ll send someone. She doesn’t open on Sundays or on days of typhoon downpour.

Golden Gai has really grown in popularity over the past 10 years and is now rather crowded and often filled with other tourists. My first trip it was mostly just locals and they were surprised to see gaijin there. Now many of the bars are filled with foreigners. However, it is still worth checking out.

Conclusion

Tokyo is an amazing city. You will never be at a loss for things to do and see. Just wandering the streets and lanes can occupy days while sampling the local cuisine deserves a whole article unto itself. This is just a guide to get you started exploring some of the amazing buildings in the area. Leave comments below if you have other suggestions or found any mistakes.

Art Show at Living Room Realty

A series of my drawings will be on display at Living Room Reality in the Alberta Arts District from October 27th through January 24th. We will be holding the opening of the show on the 27th from 6-8pm. All are welcome. Light refreshments will be served. 

Art+Grid+Horizontal.jpg

Opening: 6-8pm
Address: 1401 NE Alberta St., 97211
Dates: October 27th - January 24th